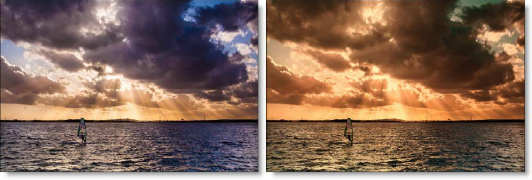
NEW IN CONTINUUM 2021, the BCC+ Sunset filter applies three photographic filters to the image which are blended together with a gradient. Presets for your favorite Color Gradient filters are provided as well as the ability to create custom colors.

Presets and the FX Editor
To select from a selection of factory installed and user-generated presets, open the FX Editor interface and pick one from the Presets window.
Common Controls
Color 1: Sets the color for the top third of the image. Select the desired color using the color picker or choose a filter preset.
Presets: Select one of the filters from the pop-up menu.
Color: The Color parameter sets the color of the grad through the use of a standard color picker.
Opacity: Sets the opacity of the color filter.
Color 2: The Color 2 controls are the same as the controls for Color 1 except it is applied to the middle third of the image.
Color 3: The Color 3 controls are the same as the controls for Color 1 except it is applied to the bottom third of the image.
Highlights
Preserve Highlights: Preserves the white areas of the image.
Exposure Compensation: Adds back the brightness loss as a result of the filter application.
Grad
Grad is the combination of the three blended tints. Its direction, corners and size can be adjusted.
Type: Controls the direction of the gradient
- Top-to-bottom: The direction of the gradient is from top to bottom.
- Bottom-to-top: The direction of the gradient is from bottom to top.
- Left-to-right: The direction of the gradient is from left to right.
- Right-to-left: The direction of the gradient is from right to left.
- Horizontal Strip: Horizontal strip gradient gradient
- Vertical Strip: Vertical stripgradient grad.
Size: Adjusts the overall size of the gradient.
Angle: Adjusts the angle of the gradient
The grad can also be corner pinned by adjusting the Corner Pin sliders as well as dragging the four points on the corners of the screen.
Note: You may need to zoom the image out a bit to see the corner points. In addition, to see and adjust the corner points in After Effects, make sure that the effect title in the Effect Controls window is highlighted. For Final Cut Pro, you must activate the cross hair icon next to the corner position parameters to see and adjust the corner points on the screen.
- Upper-Left: Controls the X and Y position of the Upper Left Point.
- Upper-Right: Controls the X and Y position of the Upper Right Point.
- Lower-Right: Controls the X and Y position of the Lower Right Point.
- Lower-Left: Controls the X and Y position of the Lower Left Point.
PixelChooser: The BCC PixelChooser provides simple, built-in masking of the effect result. The PixelChooser is generally used to select a portion of the image and restrict an effect to just the selected area while maintaining the original image content in unselected regions. The selection can be based on geometric shapes or on the image’s luma/color properties.
For more information on the PixelChooser, Click Here.
Working with The Filter
- Apply BCC+ Sunset from the Grads and Tint unit.
- Click the BCC FX Editor button. The FX Editor user interface opens and consists of Presets, Parameters and Viewer windows.
- Try out some of the presets.
- Adjust the Grad > Type, Corner Points, Size and Angle.To adjust the Corner Points, just click and drag them to the desired location.
- To change the Sunset colors, click on the Color 1, 2 or 3 > Color box and select a color.
- If you want less coloring of the image, turn down Color 1, Color 2 or Color 3 > Opacity.
- Image highlights can be retained by adjusting the Preserve Highlights control to a value of 100.
- Change your View to Grad to see the color gradient being applied to the image.
- Change your View back to Output to see the filtered image.
- Click the Apply button to return to the host application.
The values of the parameter adjustments in the FX Editor user interface are transferred to your host application.