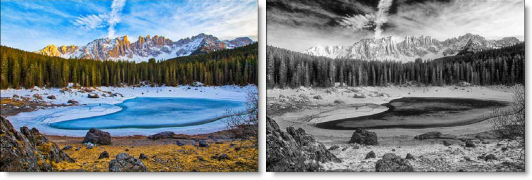
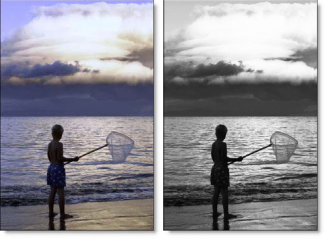
NEW IN CONTINUUM 2021, the BCC+ Infrared filter simulates infrared filters used in conjunction with infrared sensitive film or sensors to produce very interesting black and white images with glow in highlight areas.

Presets and the FX Editor
To select from a selection of factory installed and user-generated presets, open the FX Editor interface and pick one from the Presets window.
Filter Parameters
Black and White: Select the type of black and white filter to be applied to your color image.
- Normal: Converts the color image to a monochrome image.
- Red: Simulates a red filter in black and white photography.
- Green: Simulates a green filter in black and white photography.
- Blue: Simulates a blue filter in black and white photography.
- Yellow: Simulates a yellow filter in black and white photography.
- Orange: Simulates an orange filter in black and white photography.
Mist parameters control the style, intensity and softness of the glow across the image.
Blend: Determines the blend mode to be used to create the glow effect.
- Add: The glow is added to your image.
- Screen: The glow is combined with the image using a Screen blend mode. This looks kind of like the Add blend mode, but highlights are retained.
Brightness: Sets the intensity of the glow.
Blur: Sets the softness of the glow.
The Color Correct parameters allow you to fine tune the brightness, contrast and gamma of the image prior to any adjustments to the black and white or glow parameters.
- Brightness: Adjusts the brightness of the image. Positive values brighten, negative values darken.
- Contrast: Adjusts the contrast of the image. Positive values increase contrast, negative values decrease contrast.
- Gamma: Adjusts the gamma of the image. The gamma adjustment leaves the white and black points the same and only modifies the values in-between. Positive values lighten the midtones, negative values darken the midtones.
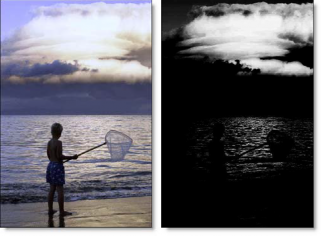
The Matte parameter group controls consist of Position, Range and Blur parameters. The white areas of the matte are the areas that will be affected by the filter, while the black areas remain unaffected. The matte is extracted based on luminance, in most cases, and is created using the Position and Range parameters.
- Position: Selects the values to be included in the matte. A higher Position value shows more white values from the original image as white values in the matte. A lower Position value shows more black values from the original image as white values in the matte.

Position 100, Range 25
- Range: Controls the range of values to be used for the matte. Once you’ve selected the “Position”, you can then add or subtract the “Range” of values to be included in the matte. A higher Range value includes more white values in the matte while a lower Range value includes less values in the matte.

Position 100, Range 75
- Blur: The matte is blurred by a quality blur.
PixelChooser: The BCC PixelChooser provides simple, built-in masking of the effect result. The PixelChooser is generally used to select a portion of the image and restrict an effect to just the selected area while maintaining the original image content in unselected regions. The selection can be based on geometric shapes or on the image’s luma/color properties.
For more information on the PixelChooser, Click Here.
Working with The Filter
- Apply BCC Infrared from the BCC Art Looks unit category.
- Click the BCC FX Editor button from the Effects and Presets banner.The FX Editor user interface opens and consists of Presets, Parameters and Viewer windows.
- Try out some of the presets.
- Choose the type of black and white filter to be applied to your color image from the Black and White pop-up menu.The type of Black and White filter that you choose can dramatically change the look of your image.
- Set the Mist > Brightness and Blur to your liking.
- If you want, you can use the Color Correct controls to modify the Brightness, Contrast and Gamma of the image.In some of the filters, a matte is generated to create the desired effect–in this case, diffusion.
- Change your View to Matte to see the matte values.The areas that are white in the matte are the areas where diffusion will be introduced. The location of the diffusion within the scene can be adjusted by modifying the Matte > Position and Range parameters.
- Change the Matte > Position parameter if you want to select different values to be used for the matte.
- Increase the Matte > Range control to add more values to the matte. Decrease for less values.
- Increase the Matte > Blur parameter to soften the transition areas of the matte.
- Change your View to Output to see the filtered image.
- Click the Apply button to return to the host application.
The values of the parameter adjustments in the FX Editor user interface are transferred to your host application.