
Overview
The Chroma Key Studio is an all-in-one keying suite. It combines screen enhancement, auto-garbage matte and masking, chroma key, matte cleanup, matte choker, foreground color correction and light wrap into a single filter.
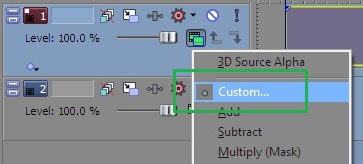
Vegas Pro Workflow Tip: To use the Light Wrap feature in Vegas Pro you must apply the filter in Custom Composite Mode. For more information on working with Custom Composite Modes in Vegas, Click Here.
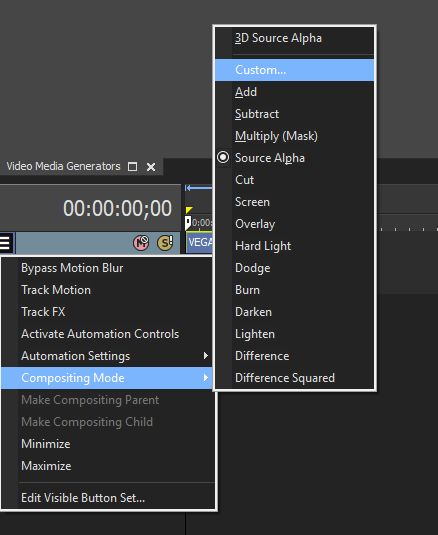
Using Custom Composites in Vegas Pro
Function
Presets and Common Controls
BCC filters come with a library of factory installed presets plus the ability to create your own custom presets and preview them with the BCC FX Browser™.
BCC filters also include common controls that configure global effect preferences and other host-specific effect settings.
For more information about working with presets and other common controls, Click Here.
Compare Mode
The BCC Compare Mode provides a convenient mechanism to compare the effect result with the original source layer. It provides several variations on basic split-screen views with the filtered clip placed next to the unedited original.
For more information on the Compare Mode, Click Here.
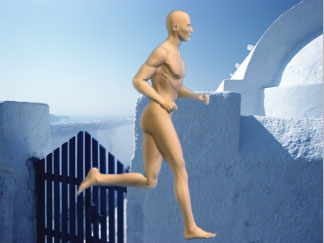
View Options: Changes the output of the filter letting you view various intermediate mattes and masks – useful in analyzing and fine tuning the results of different keying stages.
- Final Composite: The final output of the filter.
- Source: The original unchanged input source image.
- Quick Mask Matte: A grayscale preview of the matte produced by the Quick Mask pass.
- Outside Mask: A grayscale preview of the Outside Mask shape.
- Inside Mask: A grayscale preview of the Inside Mask shape.
- Pre Key Cleanup Selection: A grayscale preview of the region selected for cleanup in the Pre Key Cleanup pass.
- Pre Key Cleanup Output: The output of the Pre Key Cleanup operation.
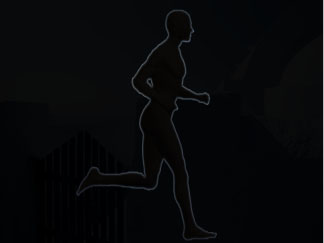
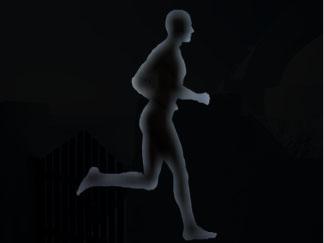
- Chroma Key Matte: A grayscale preview of the matte output by the Chroma Key pass
- Matte Choker Matte: A grayscale preview of the result of the Matte Choker pass applied to the output of the Chroma Key
- Wrap Only: A preview of just the regions affected by the Light Wrap, with the unaffected regions left as transparent.
- Wrap On Black: A preview of just the regions affected by the Light Wrap composited over black.
- View Current Matte: A convenient variation on the other matte preview modes which shows the combined matte output no matter which combination of matte pre and post key operations are currently enabled.
- View Matte Noise: A very handy preview mode for identifying hard to spot regions where either the screen is incompletely keyed out or where the foreground is partially keyed out. Alpha channel values that are exactly 0 will be displayed as black, alpha channels that are exactly 100% will be displayed as white, and then any alpha channel values between 0 and 100% will be displayed as solid gray pixels which makes it easy to spot small bits of grunge in your screen region or small print through areas in your foreground.
Quick Mask Group
A quick and easy way to create tight junk mattes around your foreground, even when faced with unevenly lit or noisy screens. This lets you focus your attention on just the regions immediately bordering your subject. To create the Quick Mask, use a quick and dirty linear key to punch out the screen and then apply negative choke to pull the key back outside any foreground regions that were keyed out during the initial rough key.
Quick Mask On: Enables or disables the Quick Mask pass.
Key Color: Determines the color of the rough Quick Mask key. This won’t necessarily match the color chosen later in the Chroma Key group for the final Color Key pass. Pick a color representing a good “average” tone over your screen region.
Hue, Lightness, and Saturation Tolerance: Controls the Hue, Lightness, and Saturation matching tolerances in the initial Quick Mask Key. Adjust to make sure as much as possible of the screen region is keyed out without keying out too much of the foreground. In this Quick Mask pass it’s alright to key out edges of foreground objects since they will be restored by the negative choke.
Suppress Noise: If your screen contains small regions that are so far away from the key color that they can’t be selected in the Quick Mask key without pulling into large amounts of your foreground, the Suppress Noise feature can be used to eliminate them. For example, dead pixels or garbage lines on the image edge will can be purged by the Suppress Noise feature in Quick Mask and increasing the Suppress Noise will purge larger regions. If Suppress Noise is set to high values the Choke should be set to more negative values. In some cases the Iterations slider may need to be increased to ensure that the foreground is fully restored by the end of the Quick Mask pass.
Blur: Soften the matte to create smoother contours in the Quick Mask output.
Choke: Use negative choke to restore any foreground regions which may have been partially masked out as part of the initial rough Quick Mask key. Use more negative values to restore eroded foreground regions.
Iterations: When high negative choke values are not enough to restore the foreground, increasing iterations will carry out the restoration multiple times until the foreground is fully restored.
Outside Mask Group
Create geometric junk mattes which include spline based masking (in certain hosts).
Outside Mask Shape: Enable/Disable Outside Masking and control the type of Mask Shape
- Off: Outside Masking is disabled and the image retains its original shape.
- Rectangle: Generates a rectangular mask.
- Egg Shape: Generates an egg-shaped or oval mask.
- Spline Mask: [Supported only in Avid and After Effects] Use a spline based junk matte for optimal masking control.
Host Mask: [After Effects Only] Select an After Effects mask to junk matte objects in your animation.
Invert Outside Mask: Invert the shape of the Outside Mask region.
Outside Crop Top-Left: Controls the top left point of masking rectangle.
Outside Crop Bottom-Right: Controls the bottom right point of masking rectangle.
Outside Egg Point 1: Controls the top point of the egg shaped mask, allowing you to modify the dimensions and orientation of the shape.
Outside Egg Point 2: Controls the bottom point of the egg shaped mask, allowing you to modify the dimensions and orientation of the shape.
Outside Width: Controls the width of the egg shaped mask.
Outside Scale: Controls the scaling of the egg shaped mask, allowing it to be enlarged or shrunk without changing the relative shape.
Outside Egg Shape: Controls the symmetry of the egg. It can become more egg-like or more oval.
Outside Feather: Controls the edge softness of the masked shape.
Inside Mask Group
Create geometric mattes to restore foreground features which are inadvertently keyed out by the main Chroma Key (such as clothing elements that match the screen color or shiny objects which reflect the screen color).
Inside Mask Shape: Enable/Disable Inside Masking and control the type of Mask Shape
- Off: Outside Masking is disabled and the image retains its original shape.
- Rectangle: Generates a rectangular mask.
- Egg Shape: Generates an egg-shaped or oval mask.
Invert Outside Mask: Invert the shape of the Inside Mask region.
Inside Crop Top-Left: Controls the top left point of masking rectangle.
Inside Crop Bottom-Right: Controls the bottom right point of masking rectangle.
Inside Egg Point 1: Controls the top point of the egg shaped mask, allowing you to modify the dimensions and orientation of the shape.
Inside Egg Point 2: Controls the bottom point of the egg shaped mask, allowing you to modify the dimensions and orientation of the shape.
Inside Width: Controls the width of the egg shaped mask.
Inside Scale: Controls the scaling of the egg shaped mask, allowing it to be enlarged or shrunk without changing the relative shape.
Inside Egg Shape: Controls the symmetry of the egg. It can become more egg-like or more oval.
Inside Feather: Controls the edge softness of the masked shape.
Pre Key Group
Lets you smooth or color correct the screen color before keying takes place. This helps with pulling a clean key.
Pre Key Cleanup On: Enable or Disable the Pre Key Cleanup pass.
Cleanup Key: There are two different methods of performing the cleanup of the selected green screen region:
- RGB: Matching color tolerance in the RGB space.
- HLS: Matching color tolerance in the HLS space.
Color: Picks the color of the green screen area that you want to clean up.
Color Range: Controls RGB color matching tolerance.
Blend: Lets you control the softness around the edges of the color selection region.
Hue Tolerance: Controls HSL matching tolerance in the hue component of the color space.
Lightness Tolerance: Controls HSL matching tolerance in the lightness component of the color space.
Saturation Tolerance: Controls HSL matching tolerance in the saturation component of the color space.
Cleanup Method: Defines the operation you perform on the selected region to improve the quality of the background region. There are two cleanup options:
- Color correction: Applies image color correction to the selected screen pixels in order to narrow their levels and/or increase their saturation.
- Push to solid: Generates a more uniform single color background.
Output Black: Helps narrow the color range of the screen by raising the black levels.
Output White: Helps narrow the color range of the screen by lowering the white levels.
Saturation: Amplifies the saturation of the screen region which can enable the chroma key to pull a cleaner key, particularly with screens that are not highly saturated.
Push to Solid Amount: Controls how completely the background screen is pushed towards a uniform color.
Chroma Key Group
Chroma Key is used for compositing camera footage shot using a blue, green, or red screen as a backdrop over a new background video or a still image from a separate file.
Chroma Key On: Enable or Disable the Chroma Key pass. Temporarily disabling the Chroma Key pass can be very handy when tweaking the controls in the screen preparation groups such as Quick Mask, Outside/Inside masks, and Pre Key Cleanup.
Increasing Density makes transparent areas more transparent and opaque areas more opaque. Too much Density can degrade the matte.
Balance adjusts the balance between density and lightness. Adjusting balance can enhance semi-transparent foreground objects and shadows.
Increasing Lightness makes the entire matte more transparent. Boosting transparency might be necessary to ensure that the background shows through semi-transparent areas, although too much Lightness can result in the background image showing through the foreground subject.
Use the eyedropper to choose a key Color from the image background. If you are working with a human subject, pick a color from a background location close to the subject’s hair line, but not in the hair itself. If the default key Color pulls a matte which removes a lot of the source image, it can be difficult to use the eyedropper to select a different key Color. Temporarily hide the filter and pull the correct matte color from the unfiltered image.
Red Weight, Green Weight, and Blue Weight adjust the weight of the corresponding color channel in creating the matte. Adjusting the weights of the color channels slightly changes the key Color and can help improve the matte.
Spill Suppression On: Enable or Disable the Spill Suppression pass.
Spill Suppression Group
After you are satisfied with the matte, check the for color spill, the presence of the background color in the foreground. If a spill is present you can substantially reduce it by modifying Spill Ratio, Tone Mix, and Tone Range. It is best to adjust the controls in the order described.
The first step in spill removal is to adjust Spill Ratio until most of the background color is gone from the foreground. Lowering Spill Ratio to 0 creates a magenta (if the key color is green) or yellow (if the key color is blue) tint in the foreground. Increasing this value to 200 leaves the original foreground color unchanged, with no adjustment for spill.
Spill Tone Mix has the opposite effect of Spill Ratio; it adds background color to the foreground image. For example, if you work with a green screen image, you can increase Tone Mix to compensate for magenta tint created by lowering the Spill Ratio.
Increasing Spill Tone Range increases the range of the foreground color mix, which can also help restore the original color to the flesh areas.
Matte Cleanup Group
Color correction style tools for post processing the alpha channel to improve the quality of imperfect mattes, for example pushing alpha noise in key regions down to zero or restoring full opacity in foreground regions that were partially keyed.
Matte Cleanup: Checking this button will activate the Matte Cleanup functions.
Black Level: All alpha values below the Black Level setting will be pushed to fully transparent. When the initial results of the key leave incompletely keyed screen regions due to noisy or unevenly lit screens this, setting this Black Level control to the maximum alpha value still present in the key will push the incompletely keyed regions down to fully transparent.
White Level: All alpha values above the White Level setting will be pushed to fully opaque. When the initial results of the key leave partially keyed foreground regions in areas that should have remained fully opaque, setting this While Level control to the minimum alpha value present in the foreground region will push the partially keyed regions back up to fully opaque.
Gamma Level: Shift the overall balance of the alpha levels along a gamma correction curve to tweak the look of the foreground edges.
Matte Choker Group
Expand or contract the edges of the key.
Matte Choker On: Enable or disable the the Matte Choker pass.
Matte Choker: Matte Choker is a tool for the often frustrating task of adjusting mattes that are not quite right. A first-pass matte often has unwanted holes in areas that should be opaque, and/or unwanted spots in areas that should be transparent. These problems can usually be fixed with Matte Choker.
Matte Choker uses an iterative technique to process the source alpha channel. In other words, the filter applies one stage of the process to the source image, then applies a second stage to the output of the first stage, and repeats the process using the output of each iteration as the input of the next.
Blur softens the image’s alpha channel.
Positive Choke values push the tones in the matte toward transparent, tightening the edges of the matte around the foreground image. Negative values push the tones toward opaque, expanding the edges of the matte away from the foreground image.
Gray Soften controls the amount of affect the Choke setting has. When Gray Soften is 100, the Choke value has no affect on the image. If Gray Soften is 0, the Choke acts as an alpha extract and produces a purely binary key.
- Note: To contract the matte to get rid of areas in the foreground, use a positive Choke value. Increase Blur to increase the softness of the transparent areas, and adjust Gray Soften to adjust the sharpness of the borders of the matte. To expand the matte, follow the same guidelines using a negative Choke value. You may also want to apply a choke in one direction and a second choke in the opposite direction to deal with problem areas created by the first choke. You can use the Iterations control to repeat adjustments a number of times.
Color Correction Group
Adjust the foreground color to better match the background scene and achieve more realistic final composites.
Color Correction On: Enable / Disable the Color Correction pass.
Brightness adjusts the brightness of the image. Increasing Brightness pushes colors toward white, and decreasing Brightness pushes colors toward black.
Contrast adjusts the contrast of the image. Increasing Contrast pushes colors toward pure colors, and decreasing Contrast pushes colors toward 50% gray.
Hue cycles the colors in the image around the color wheel in HSL color space. Most color corrections require very small changes; adjustments of 10° or less usually suffice. Adjustments larger than 10° usually produce very dramatic color changes.
 |
 |
 |
| Hue=-20 | Hue=0 | Hue=20 |
Saturation adjusts the intensity of each color’s hue in the image. Negative values remove color from the image, and positive values add color to the image.
 |
|
 |
| Saturation=-20 | Saturation=0 | Saturation=20 |
Output Black adjusts the luminance level of black pixels. Increasing Output Black from its default value of 0 makes black pixels brighter and pushes the RGB color space toward white.
Output White adjusts the luminance level of white pixels. Decreasing Output White from its default of 255 makes white pixels darker and pushes the RGB color space toward black.
Light Wrap Group
The BCC Light Wrap reflects a background image around the edges of a foreground image to form a border. This creates the illusion that light from the background image is reflected onto the foreground image which in turn creates a more convincing composite by making it appear as if the images were shot in the same environment.
Vegas Workflow Tip: To use the Light Wrap feature in Vegas you must apply the filter as a “Custom Composite Mode” (also known as a “2 to 1 Transform” effect). For more information on working with Custom Composite Modes in Vegas, Click Here.
Using Vegas Custom Composite Mode
Light Wrap: Enable/Disable the Light Wrap pass.
Lightness sets the lightness value of the reflected image. Negative values make the reflection darker and positive values make the reflection lighter.
 |
 |
 |
| Lightness= -1 | Lightness=.5 | Lightness=1 |
The Softness parameter softens the edges of the border image that is reflected or wrapped.
Width controls the width of the reflection or wrap that is generated. Higher numbers result in a larger border. The following examples show the View menu set to Wrap On Black.
 |
 |
| Width=3 | Width=20 |
The Apply Mode menu determines the method that is used to composite the border. For descriptions of all the possible Apply Modes, Click Here.
Mix with Original blends the original and modified results. Use this parameter to control the effective amount of the light wrap adjustment.
The Background menu allows you to choose the media to use as the reflected source.