Think of all the top movies from the past decade. What do they all have in common? Epic worlds that are so stunningly realistic you feel like you are really there. These films are created in no small part thanks to the power of the chroma key and a visual effect artist’s ability to “pull a perfect key,” i.e. removing a subject from green or blue screen footage.
In this guide, you’ll get a brief history of the chroma key, how to prepare your green screen set to avoid common shooting pitfalls, a glossary of terms, and discover why Primatte technology delivers the best solution to accomplish seamless composites fast whether a subject is placed over live-action or a CG background.
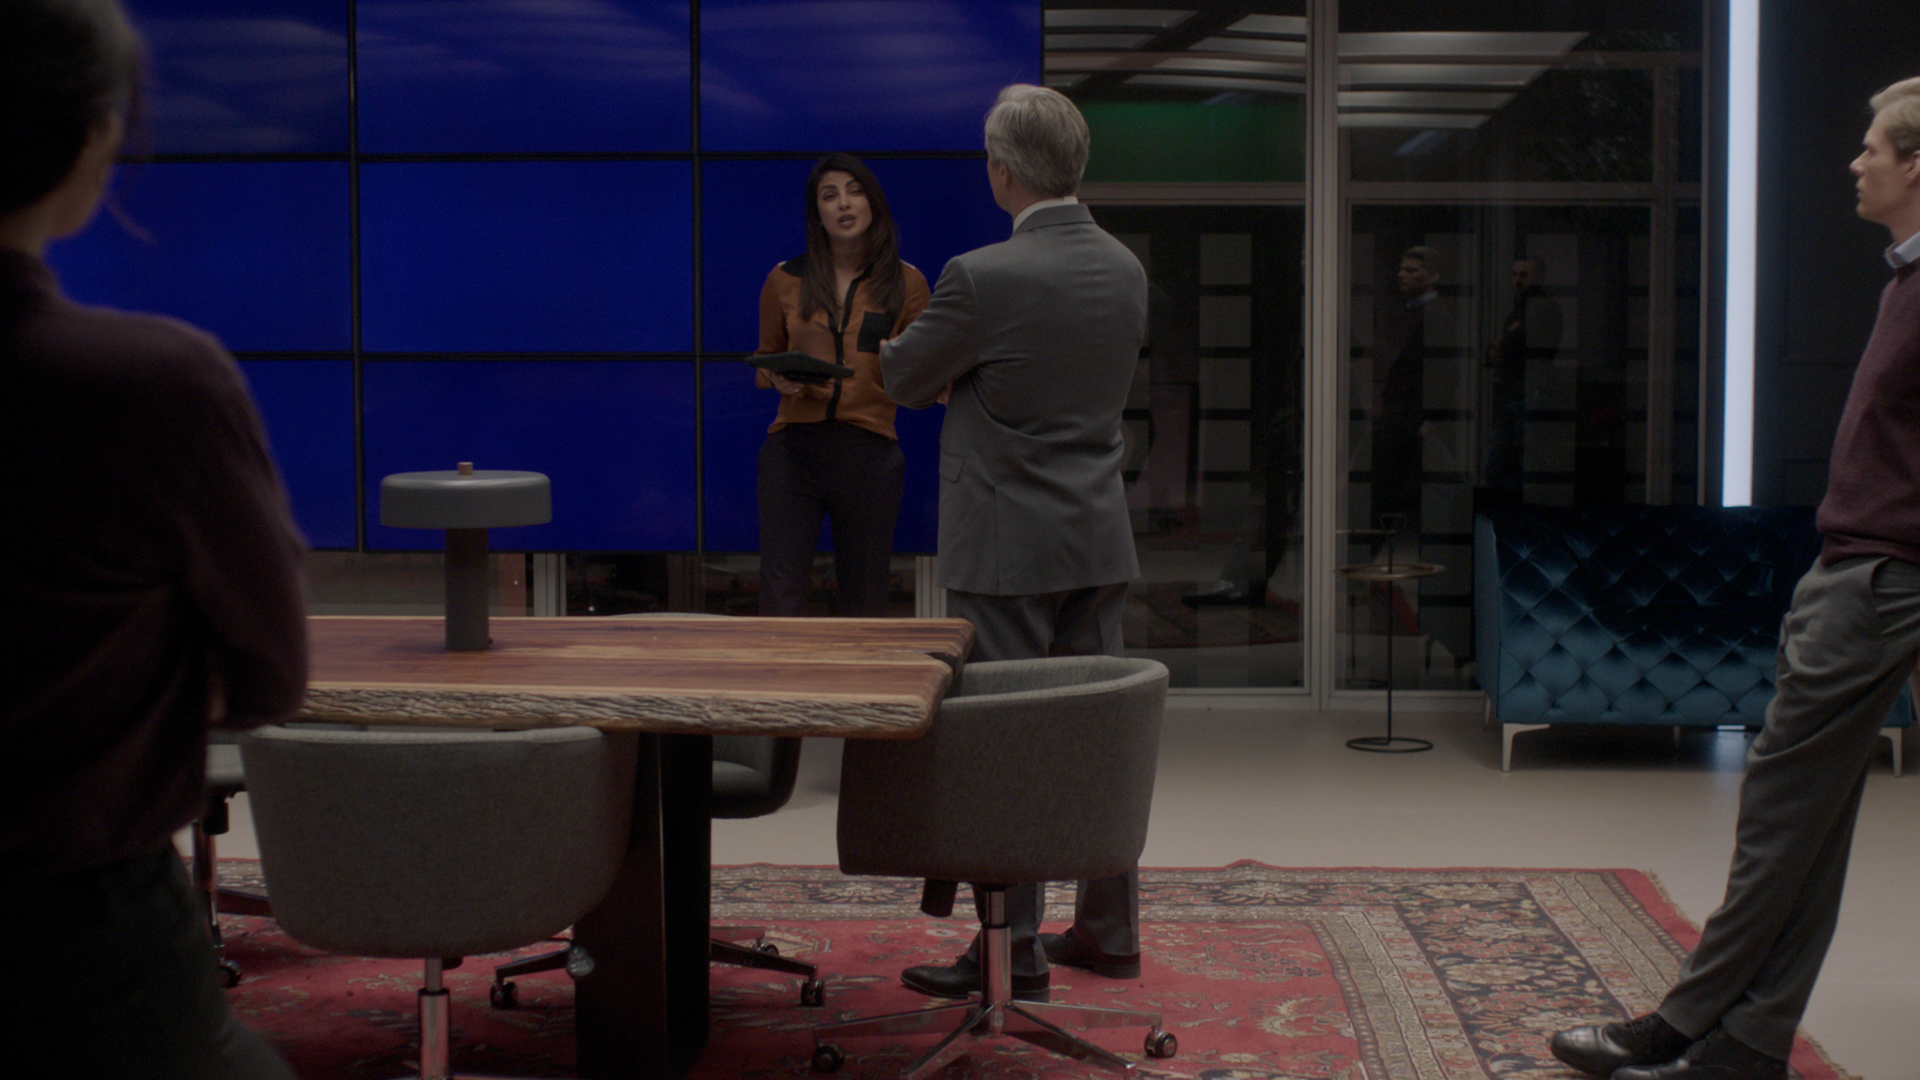
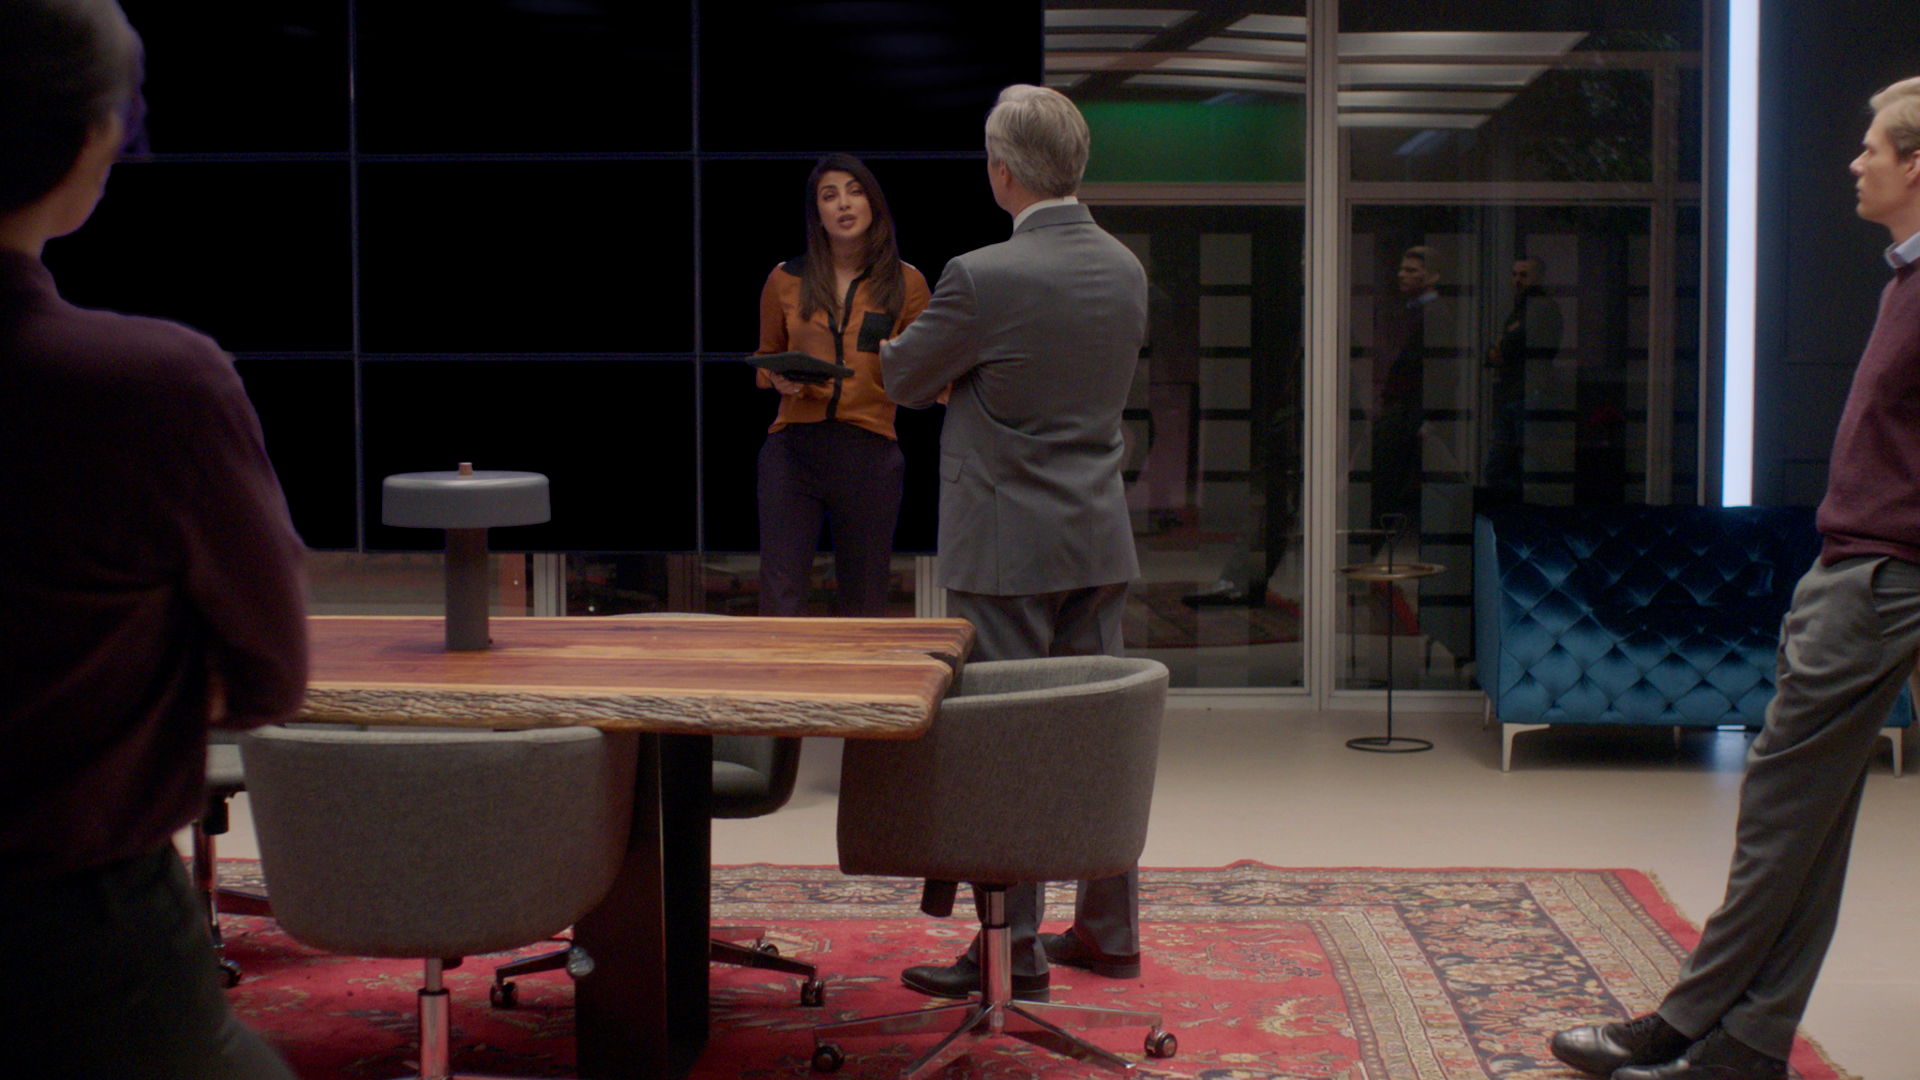
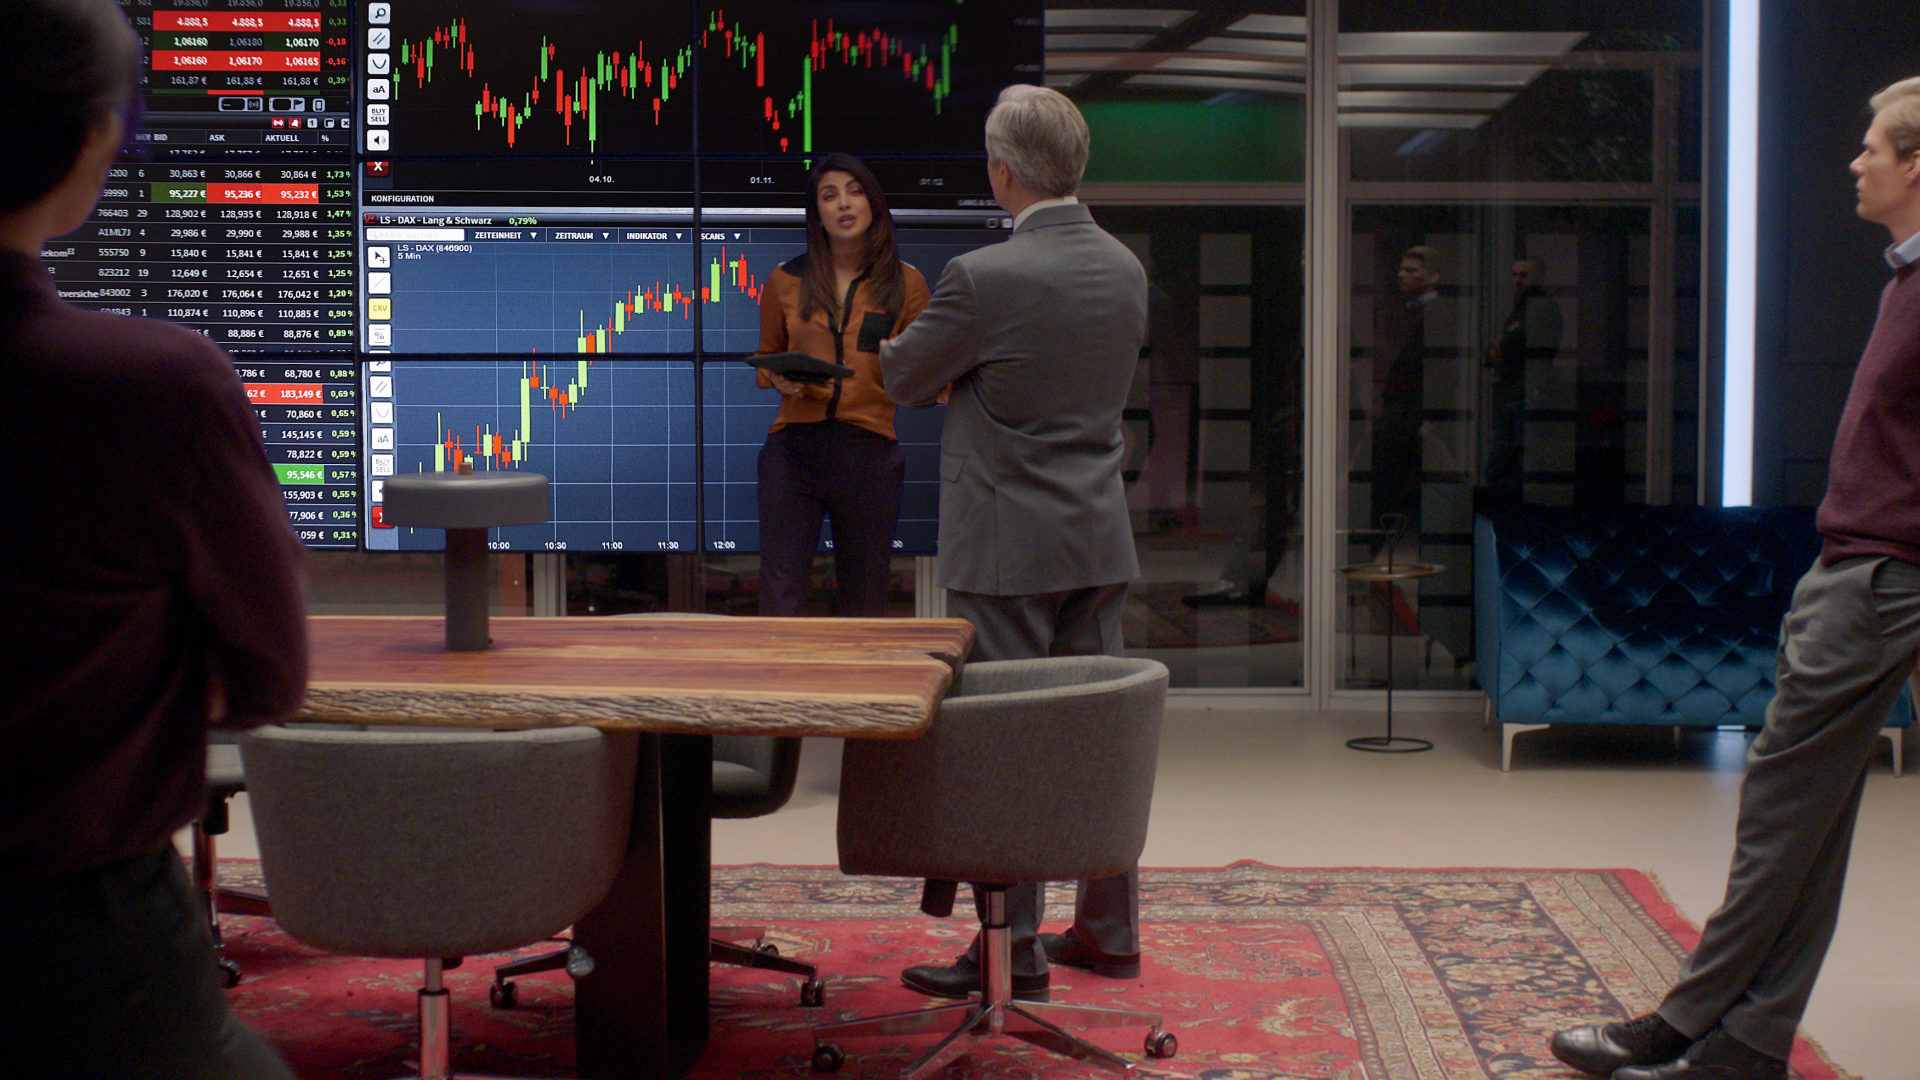
Before and after: Actors in front of blue screen and the blue removed, leaving a black background that is actually transparent. In traditional VFX terms, this is called a “hold out matte.” In digital compositing, the transparency (the checkerboard or black area) around the subject is the alpha channel. (Quantico, ABC)
Brief History of the Chroma Key
The art of chroma keying is so central to how stories are told on screen that its invention harkens back to the first years of the silent film era. Early filmmakers experimented with visual effects such as tinting or hand painting film, but it wasn’t until Edwin S. Porter’s The Great Train Robbery (1903) that a truly groundbreaking breakthrough in VFX occurred — a train was added during a second pass. How did they do it?
Filmmakers had to get creative and that’s just what they did. Since usable color film didn’t exist, they couldn’t rely on green screening like we do now. Instead, some innovative filmmakers invented the concept of luminance or luma (black) key. The effects were created “in camera” on set with a subject posed against a black background. The film would then be rewound, the subject removed, and a new background would be exposed in the area that was masked out in the first pass. The new subject, however, in this case, a train, was limited to a certain area like a simple window or doorway. And if an actor happened to be standing in front of the protected unexposed film in the first pass, they would appear ghost-like/semi-transparent in the final shot.
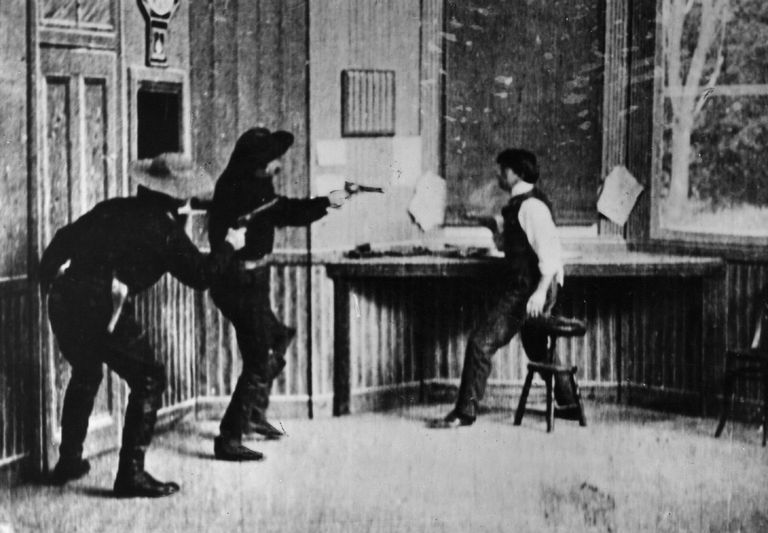
The Great Train Robbery (1903). An early VFX shot. The bandit in the middle points out the window where a moving train goes by. The train was added in a second pass.
The invention of the travelling matte overcame this static frame issue by using color separation in a single camera pass and combining it in an optical printer later. By 1940, special effects artist, Larry Butler, was credited with perfecting the modern bluescreen for Michael Powell’s The Thief of Bagdad. Over the years, there have been many attempts to create the ideal keying system including using infra-red and ultraviolet lighting and even a sodium-vapor system (similar to the yellow lamps once popular in street lighting) developed in Britain in the 1960s by Petro Vlahos.
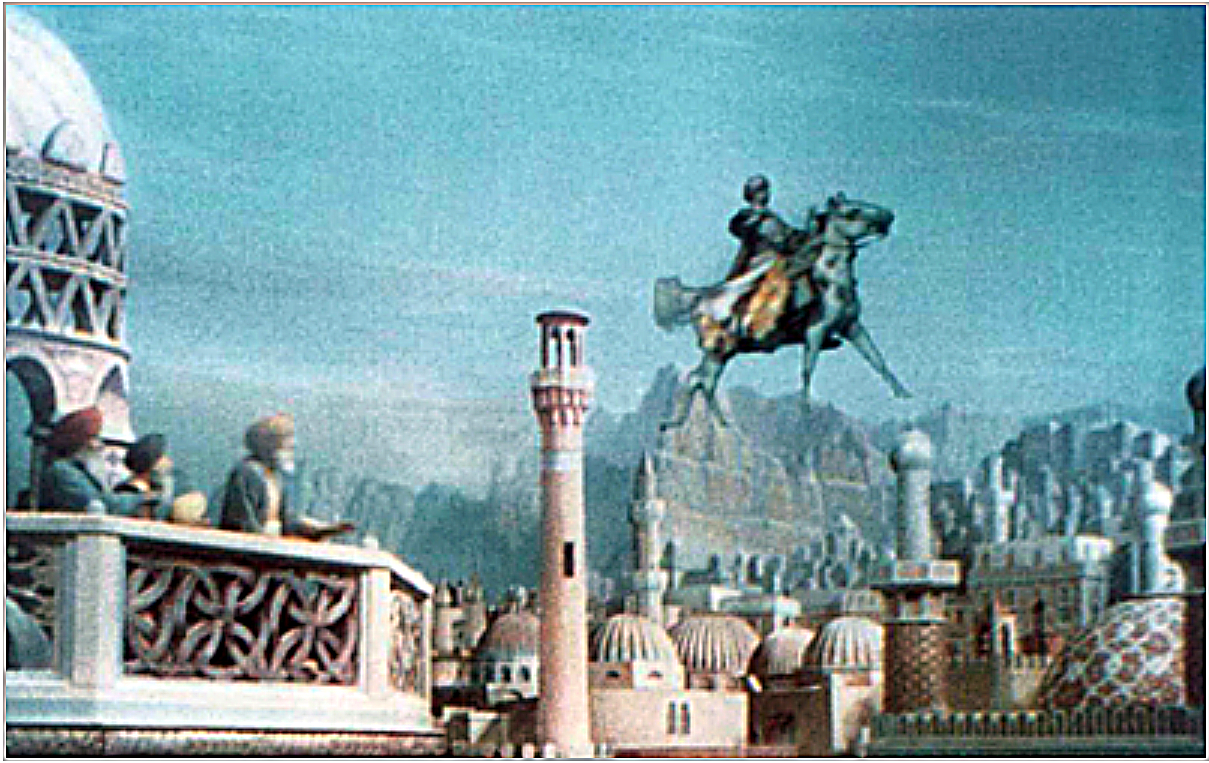
The Thief of Bagdad (1940). It’s not Star Wars, but in 1940, seeing a “real” flying horse in the movie theaters was breathtaking.
In the early 1990s, the chroma key technique went digital with the advent of affordable software for personal use (Windows and Mac). The digital revolution also introduced the alpha channel, 8-bits devoted to transparency in an image file. You could now store a black and white matte with halftone transparency with your color channels in programs such as Adobe Photoshop. Woo! This turned After Effects users working at home into visual effects wizards. It didn’t take long for the optical printer, bi-pack cameras, and animation stands to become obsolete.
Now chroma key tools like Boris FX’s Continuum Primatte Studio provide a powerful suite of plugins that make quick work out of green screen footage. Of course, VFX tools like this are necessary and will save you tons of time, especially on a poorly shot green screen, but it’s always best to avoid any potential problems by capturing good chroma key footage on set.
Picking the Right Color for Screen: Blue versus Green
Almost all the behind-the-scenes VFX breakdowns you see online feature green screen. It’s definitely used more often than blue but each has its own merits depending on the situation. Green and blue screens were originally chosen because Caucasian skin color has very little green or blue in it.
Green screen has an advantage over blue screen based on digital camera sensors. The sensors sample 50% green, 25% blue, and 25% red and are based on how the human eye perceives the visual spectrum. Humans are most sensitive to colors in the yellow-green range. Green screen has twice the information which benefits the keying algorithms.

Diagram: Blue and Green colors compared. Green has far greater luminance than blue.
Typically, blue screen is used for darker scenes and green screen for higher illumination scenes. You’ll also want to note the subject’s coloring and wardrobe when choosing the proper color background. Blond hair is a common issue with green screen because both the blond hair and a green screen have lots of yellow, hence the phrase “blondes on blue.” Clothing also shouldn’t contain any green colors or reflective materials including sequins or metal. Even sweat can reflect green light which can be hard to remove without the proper software.
There are many shades of green and blue available to work with. However, the VFX industry has standardized around a few main suppliers of green/blue paint, screen, and backgrounds (list below).
Top 4 Tips for Lighting Chroma Key
Lighting can make or break how much time you’ll spend keying and compositing your footage. Make sure to hire a good gaffer to avoid any potential lighting problems regardless of which color you’re using.
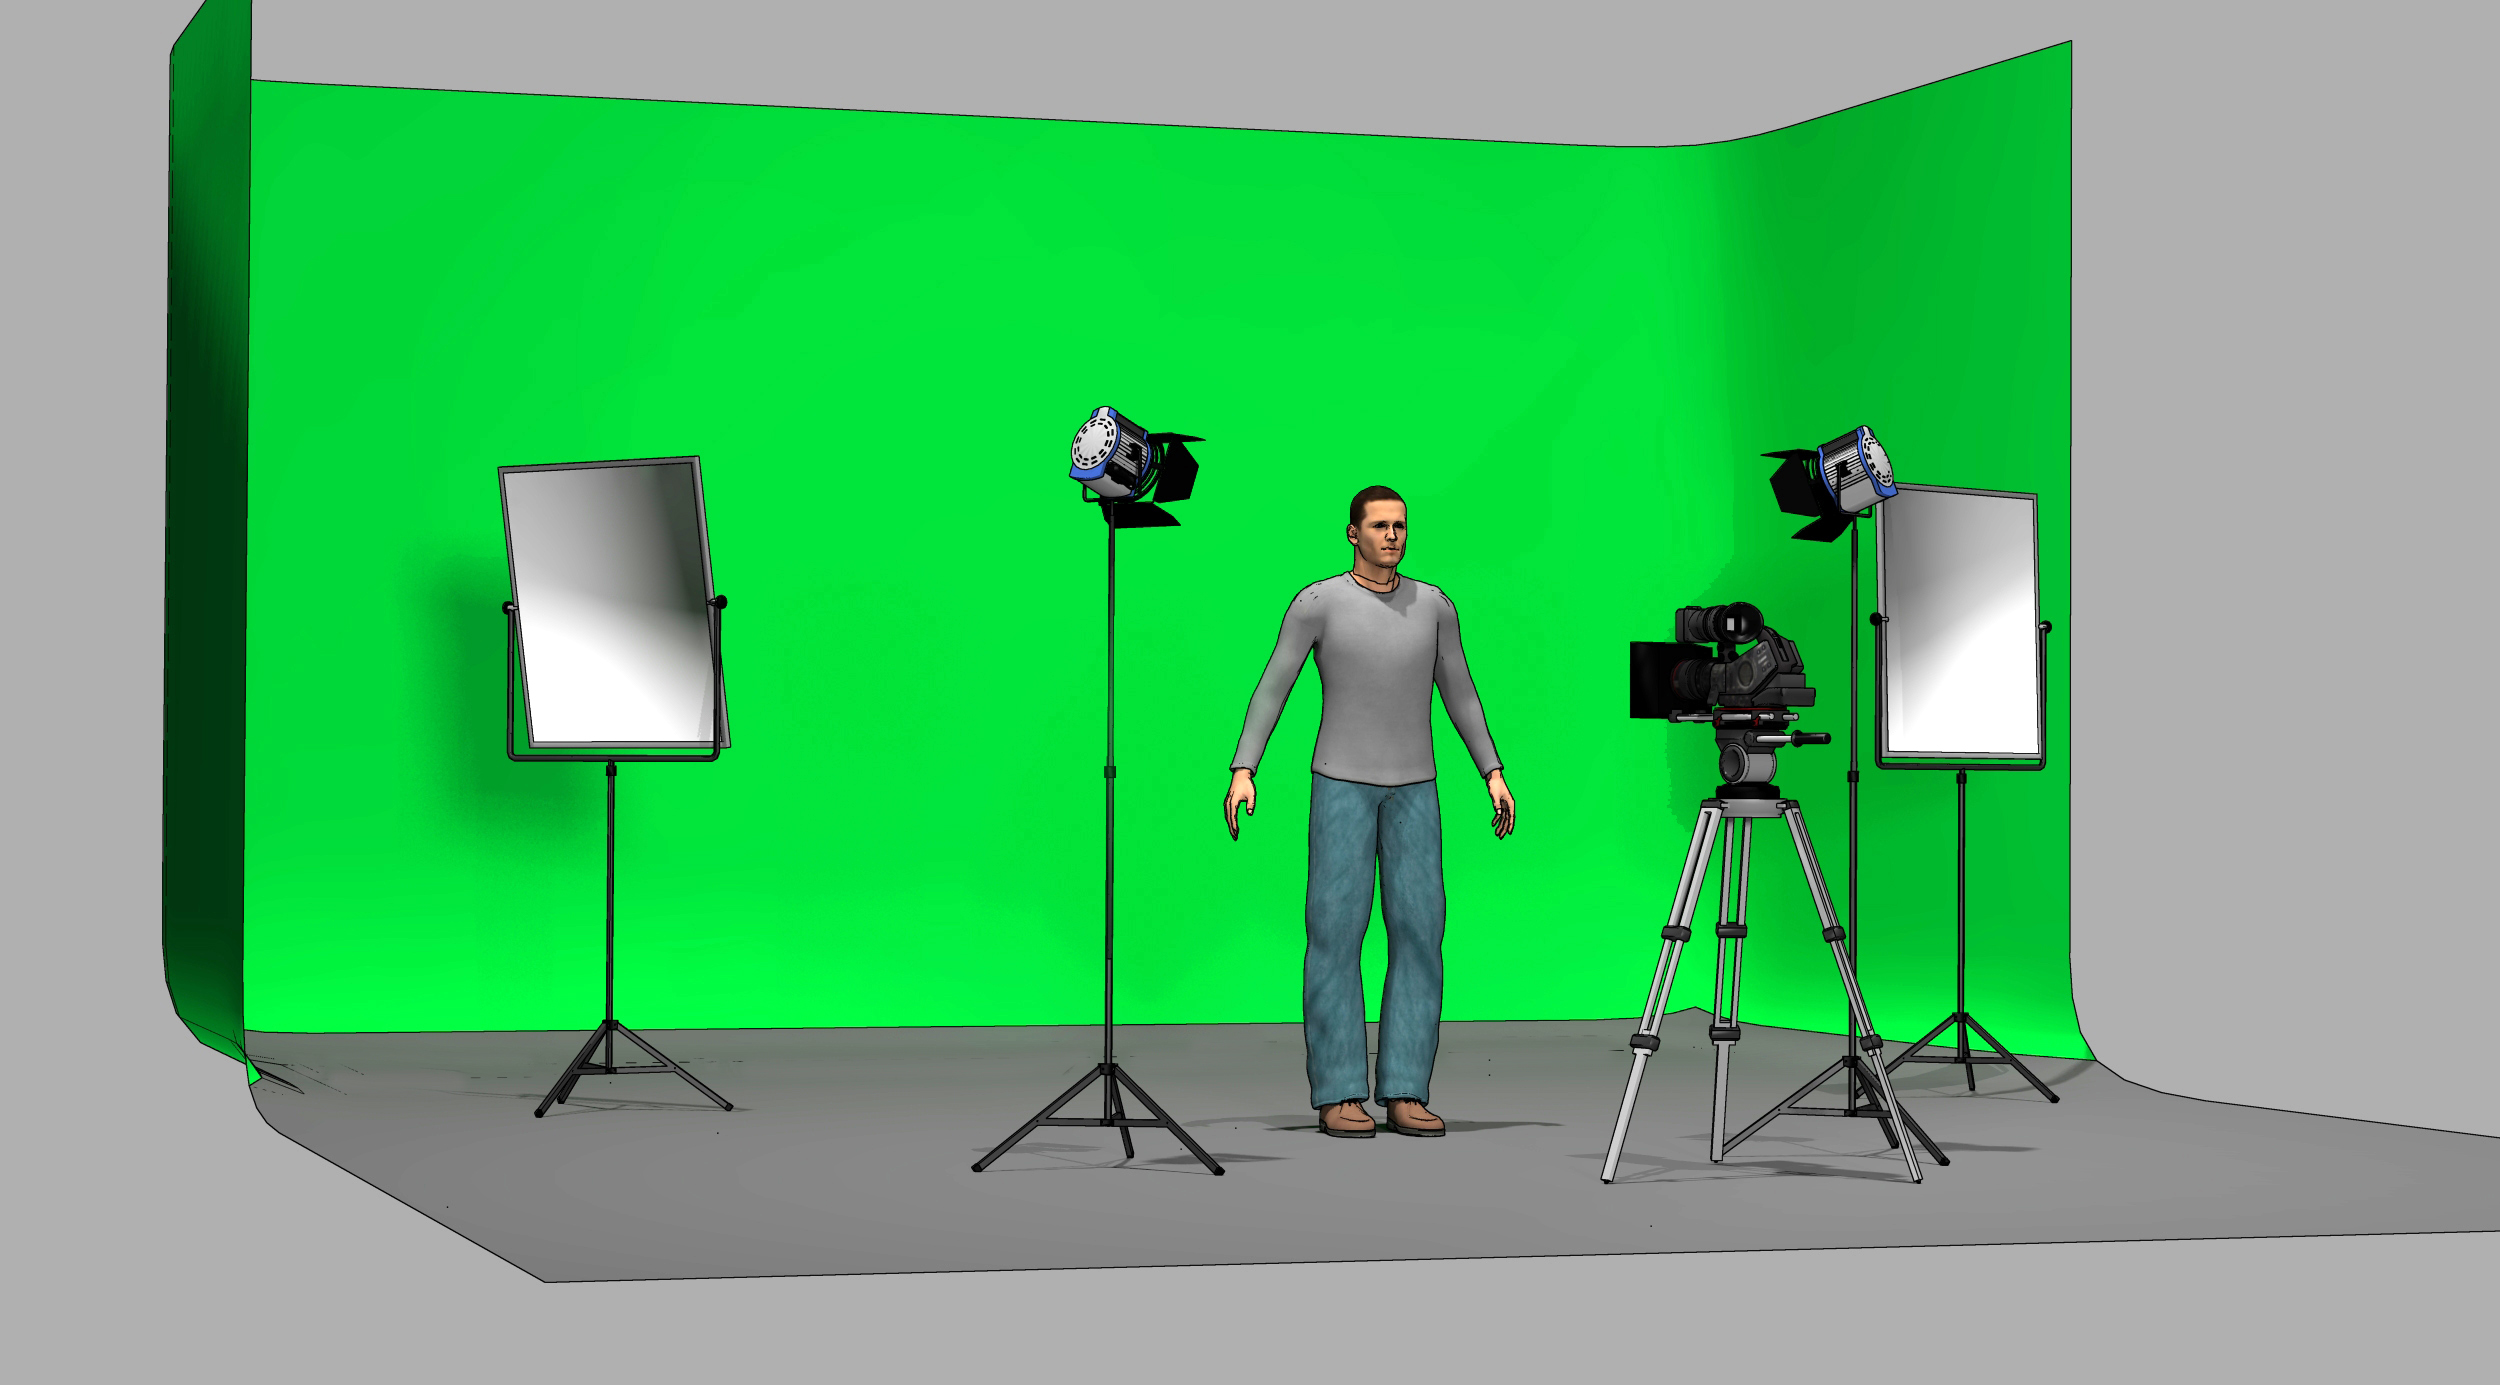
Here is a simplified lighting setup for a green screen shoot. The two big LED panels flood the background with light but not the subject. The two spotlights illuminate the subject but not the background.
Consistent (even) Lighting
One of the most important steps you can take to avoid uneven lighting is to make sure your green screen is stretched tightly across a frame or placed on a flat rigid material like foam core. Dedicated green screen studios typically have a green painted cyclorama. Once your green screen is properly set up, use soft lights like sky pans or any other diffuse light source to help reduce shadows and provide consistent lighting.
Another approach — once more popular in Hollywood — is to use a rear-projection screen. A rear-projection screen eliminates all shadows, but this requires considerable room behind the screen to project light.
Sufficient Brightness
Exposure meters, favored by cinematographers, may not necessarily be relied upon by digital filmmakers since many cameras have built-in meters and can be monitored in real-time. At the professional level, you would normally take a reflected meter reading of the green screen (typically several readings deployed across the surface to account for uneven lighting that are then averaged) and an incident reading of the subject. A common practice is to have the background lighting a stop under the subject to reduce spill while providing enough light for the camera sensor to grab a strong background value. But lighting also affects depth of field which can be used to control focus to your advantage.
There are two schools of thought here. In one approach, a shallow depth of field lets the green screen go out of focus in the interest of softening any uneven lighting. The second approach is to keep everything sharp. You might set the brightness of the background and subject lighting for one or the other. With lower illumination on the green screen and subject, the f/stop would be decreased to open the lens aperture and let in more light. The larger lens aperture also lowers the depth of field allowing the background to go slightly out of focus. Conversely, if there is a great deal of subject movement it might be difficult to hold focus and more depth of field is required. In this situation, more light on the background and subject would require a smaller lens aperture increasing the depth of field and making focusing easier.
Apart from the focus issue, you want the green screen to be exposed a little above middle gray. If you have too little light, the keying software may have a problem pulling a clean key requiring a fair amount of tweaking and cleanup. If there is too much light then green light reflected from the screen can “spill” onto the subject being isolated.
 The spill contaminates the edges of the subject and makes them semi-transparent. According to compositor Ben Brownlee, a Digital Media Specialist at Bulldog Digital Production, “Avoiding spill is one of the most important components of pulling a convincing key and has historically been a source of constant headaches. Nothing gives the game away more than a bright green halo around your subject. Even overly softened keyed edges are less jarring than an inexplicably radioactive actor. Back in the bad old days of the '00s, DV, where chroma sampling was happily sacrificed to the compression spirits, one of the common practical tricks to try to counter spill was to have a backlight in the complementary color of the screen. Magenta for greenscreens and yellow for blue. This obviously seemed like a great idea on set to a lot of people. Hit the right ratio and everything's got to just balance out, right? The reality back in the edit suite was that these things rarely ‘just balanced out’ and now you were forced to deal with correcting two opposing colors right next to each other in standard definition with limited color sampling.”
There's really no need for these types of tricks today, as software does a much better job of this task. The Continuum Secondary Spill Remover is able to kill stubborn spill not just in edges but in the places where it's needed most; namely reflections, sheer clothing, and importantly also in motion blur.
Subject Placement
The subject should be as far away from the chromakey screen as the action, lens, and staging permit. This reduces spill to a minimum, but large chroma key stages are not always available and distance from the screen may not be possible.
Light Subject and Background Separately
The subject and background need to be lit separately while also ensuring that the light from the background doesn’t spill onto the subject and vice versa. This is another reason why placing the subject as far from the green screen as possible is a smart move because it makes it easier to place the lights. Lighting the screen typically consists of multiple soft lights, so the screen can be lit around its perimeter as the diagram below shows.

This view shows how to place the subject far enough from the screen to make it easier to light the subject and the background separately. It also reduces green color spill from contaminating the subject with green light.
Light Options
You already know that soft and diffused lights are your best option to light a screen evenly. Should you ever use color? (Even white light is not a single value.) Light color is measured in degrees Kelvin, but there is also the spectral distribution curve to consider. For example, fluorescent light has a spiked distribution curve while an incandescent light has a smooth bell-shaped curve. Usually, fluorescent lights are a problem for filmmakers, but chroma key is an exception.
You can also add gels to color a light. Does it make sense to light a green screen with green light and blue screen with blue light? Yes, but there is not a great deal of info on what color green or blue gels to use. Hollywood’s Composite Component Company sells chroma key products including fluorescent tubes specifically calibrated for chroma key. Fluorescent lights are soft and maybe specially formulated to provide a green or blue light. There are also colored sleeves/gels for fluorescents. However, you would need to test the lights and the backdrop together.
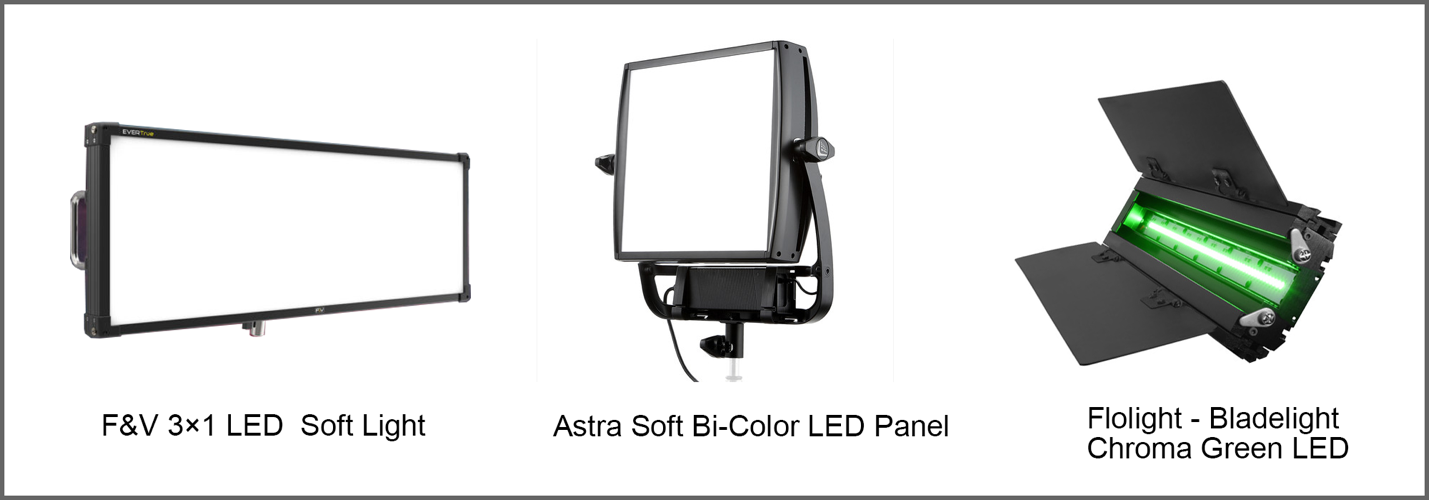 Here’s a sample of soft lights suitable for chroma key background lighting. In a pinch, you can use a more focused light by putting diffusion material in front of the light. Bounce lighting can also be used, but it’s much harder to control.
Keying Materials
You can find materials and props specifically to use in keying — such as fabric, paper, and paint — at many photo and film industry supply shops: Rosco, Savage, ProCyc, Chroma-Key.com, Composite Components Company, and FilmTools. Online prices can be competitive, but consider supporting your local supply house, if you’re lucky enough to have one. They may also be able to offer tips and advice.
Besides color, the one property to search for in the products you’ll use is this: limited or no reflection. A simple matte finish is the best.
Steve Oakley has tons of experience with various keying materials. “I generally prefer to shoot on name-brand chroma key fabrics or paint. A decade ago, I did testing between a cheap generic fabric from eBay and a couple of name brand products. The fabric that made keying the easiest was from Composite Components. So I own a couple 8X8 and 9X12’s which cover the small jobs I do. I rent when a larger screen is needed. A studio rental house may say they have 20X30 or two. However, I’ve learned to be specific in not just asking the size, but the brand. I’d rather have a name brand backdrop shipped from NY or LA. Because the added cost on a large shoot is preferable to the time and money saved in post. I know keyers have gotten so much better and make keying much more forgiving, but you try to stack the odds in your favor as much as possible to have an easy post-experience.”
Shooting Chroma Key
Garbage in garbage out. Yes, that old adage works for chroma keying too. When you shoot green or blue screen you want to record in the highest possible image format (RAW). But sometimes you can’t. In that case, you want the highest resolution and highest sampling you can get. That means 10-bit 4:2:2 is about as low as you want to go to avoid problems, but 4:4:4 is recommended.
The 4:4:4, 4:4:2, and 4:4:1 refers to chroma subsampling in video. Based on human perception, it’s possible to capture less chroma information than luminance information in the interest of faster processing and transmission. The lower quality in this instance is less noticeable to the viewer because human vision is more sensitive to luminance (grayscale) than color. Less expensive cameras tend to capture 4:4:2 or even 4:4:1 (there are many variations). However, while this works well for viewing, it’s a problem for a chroma key shot.
Although RAW is usually the gold standard for source material, it may need special handling. “I don’t feel compelled to say RAW is a requirement unless it’s more about matching the rest of a production’s look and workflow,” says Steve Oakley, award-winning reality show producer, and indie filmmaker. “In fact, RAW can add an entire level of extra problems in terms of getting the right background color level, keying off that, combining it back into the main image, and then getting a base grade for output. A log or even Rec 709 4:4:4 image in 10-bit will suffice most of the time.”
Similarly, you want the least amount of compression possible in your recording. Compression lowers the number of colors in an image to make the file smaller. But reducing the steps between different shades of the keying color makes it less precise. Chroma key software doesn’t like that. It wants all the precision it can get. “The real enemy is compression artifacts,” continues Oakley. “The less compressed your image is the better. Feeding even a DLSR into an external recorder can make your life a lot easier if that’s the camera you are working with. Most small cameras are horribly compressed and that makes for an uphill battle that will cost more in post to deal with than shooting it in a better format.”
The basic principle behind pulling a key means precisely picking out as narrow a range of green or blue as possible. That, in turn, requires the best possible chroma key footage you or the DP can provide.
Spill Removal
There are various methods to reduce spill on the subject including staying far from the background screen and using lighting to introduce the opposite color of the chroma key. As mentioned the lighting trick to remove spill is far from optimal and there are now highly effective spill removal methods in software. This brings us to a seat of the pants solution when spill is excessive. On the rare occasion when spill suppression is not 100% successful, light wrap can mask green spill in a pinch. If you’re resorting to this trick you are probably better off re-shooting, but that may not be possible. Light wrap is a compositing step to help sell a shot because, in real life, diffuse light is subtly reflected from the atmosphere and even the objects around us, the lens, and the recording medium. In computer graphics, on set light spill is called radiosity and was a highly-requested feature for 3D renderers in the 1990s. In any case, radiosity is actually a type of spill except that it comes in every direction not just from the background as it does in chroma key shoots.
Light wrap is a method of reintroducing the desired spill after we’ve removed unwanted spill from the subject we are compositing over a background plate. Light wrap filters add soft edge colors and brightness by evaluating the background plate. This is a simple filter that allows a number of controls to allow an artist to eye-match the background and foreground elements in an effect shot together. So it’s possible to use a light wrap filter to overcome green or blue chroma key spill that was not completely removed when keying the subject. Again, this is an option of last resort for a very badly lit chroma key shot.
 One last point as we discuss complex clean-up is the speed of the keying tools. It’s important that you get near-instant feedback when working because keying is often made up of a lot of small subtle adjustments as, Yoram Tal, a colorist living and working in Los Angeles explains, “As a colorist and a finisher for TV shows, I constantly find myself needing to pull keys. Unlike dedicated VFX people, when I do it, the process needs to be fast with solid results every time. It’s become a 5-10 click process thanks to Boris FX’s ContinuumPrimatte Studio and with a powerful computer, it will play without rendering in almost real-time. The ease of pulling the key and checking it right away on a moving image makes all the difference in the world for my workflow.”
Staging and Lenses
One potential problem with compositing a chroma key shot arises when different lenses or different lighting is used for the background plate and the soon-to-be chroma keyed subject. This mismatch can be difficult to fix. It helps that lens perspective and field curvature a bit forgiving in a lens’ middle ranges (35mm – 50mm on a full aperture sensor). That’s the sweet spot where most green screens are shot. But occasionally, say on a lower budget shoot without a VFX supervisor on hand, a scene may be shot with a wide lens (below 35mm in our example). This perspective shift may be difficult to match to a subject shot in the standard focal length range on the green screen stage. The solution? Flatten the wide perspective background plate with the Boris Continuum Lens Correction filter. This will allow eye-matching the subject and background by changing the background’s perspective.
Lighting mismatches are not uncommon either. When compositing a subject into a complex lighting plan with hard shadows and directional light sources, making sure you have a useful set reference is very important. Up to this point, only simple subjects in front of a flat-screen have been discussed, but there are far more challenging requirements for many VFX shots.
In the digital era, creating green sets and props has become commonplace. These will be replaced with CGI in post. The stand-in sets and props are painted green allowing actors to interact with them realistically. For example, an actor might climb a green-painted staircase that will later be replaced by a CGI staircase during the composite. Perhaps the script calls for keying out part of an actor, for example, a missing limb. The solution? Pull a chroma key green fabric sleeve tight over the actor’s leg. Chromakey shots might also require additional techniques to complete the shot such as rotoscoping and tracking. It’s important to get all the camera metadata available when shooting visual effects elements. F/stop, exposure index, focal length, frames per second, and any other pertinent data collected during the shoot can save you hours in post.
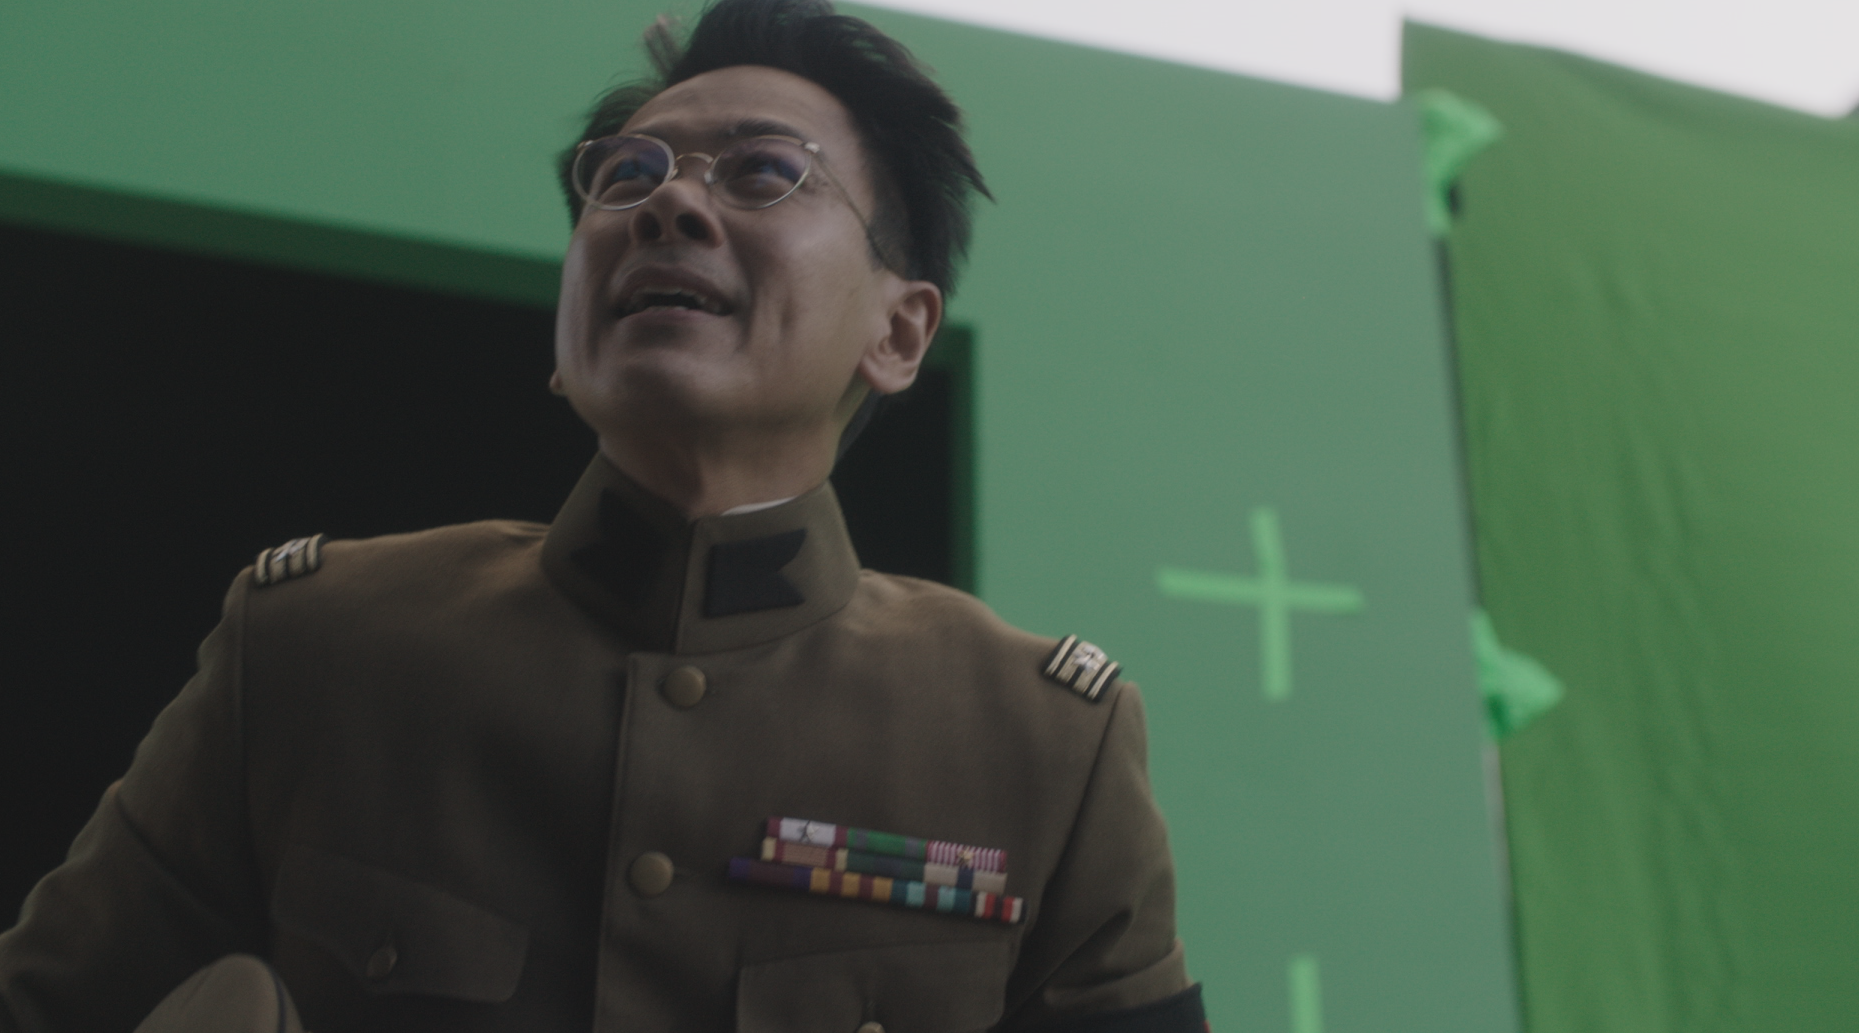
Camera movement and green screen tracking marks. (The Man in the High Castle, Amazon)
 Off World VFX studio owner and visual effects supervisor, Chris Haney, has dealt with every imaginable chroma key demand in movies like Avatar, 300, The Avengers, The Social Network, and many others. “Tracking markers need to be of high enough contrast to be trackable but not so contrasting as to create big holes in the key as those markers pass behind the talent.” He tells us, “This is often solved with a slightly different green tape on the chroma green screen. But some VFX Supervisors play it safe and put high contrast markers such as red or black and white. They are opting to have a better contrast for tracking versus easier edges to manage.”
Edges are Everything
Even though a chroma key typically fills the frame, only a few pixels around the border of the subject are of interest to artists and keying software. Everything else is basically in the way, so it’s best to remove these artifacts with a garbage matte.
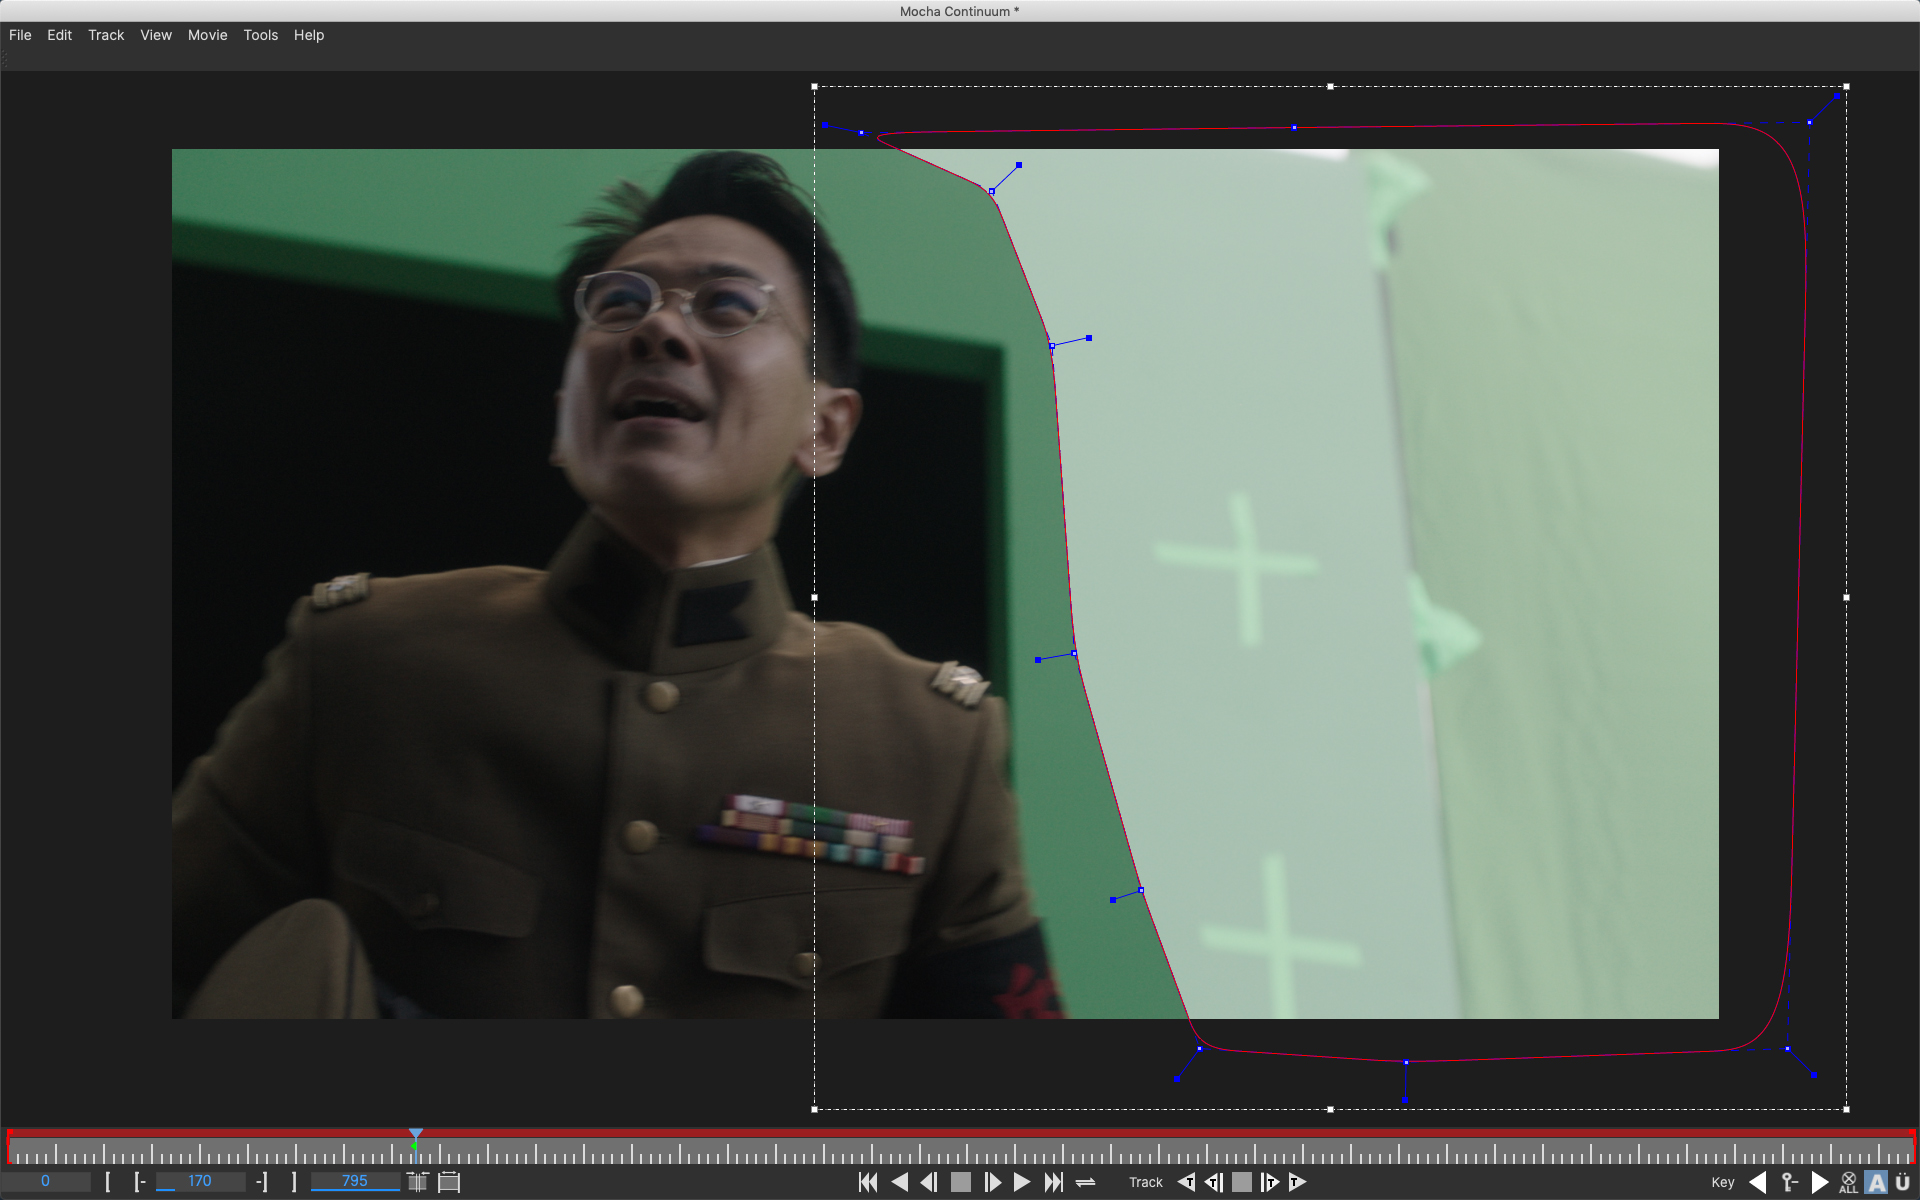
Garbage matte: Created using Continuum Primatte Studio's built-in Mocha planar tracking tools. (The Man in the High Castle, Amazon)
Steve Oakley gives good advice on an essential part of chroma key work, “Garbage mattes are a fact of life calling for extra work that pays off when keying. Lenses and lighting often fall off in the corners (vignetting) so there is no sense in making your life harder by confusing the keying software with this unnecessary data. Often we’ll have flags or production lights in the shot or tracking markers so they need to go. Usually, it’s just a matter of hand drawing the masks. If there is some camera movement it’s generally easy to track masks on them.”
Pulling a key is just plate preparation for a VFX shot. Once a subject is keyed out, it must be composited into a scene. We’re not going to go into depth about compositing, but it’s worth discussing some basic principles since tools like Continuum’s Primatte Studio have integration tools right alongside the keyer.
Compositing a chroma key element into a scene means you’re keeping your eye on one main thing: controlling what happens to your subject’s edges. Light wrap and color correction are exceptions to that, but you will still find that poorly controlled edges will be your major culprit when faced with an unconvincing end result. The first thing our visual processing system looks for is edges in order to detect and identify shapes and spatial relationships in our environment.
One of the more challenging edge issues is motion blur. Motion blur is a natural byproduct of a moving subject in both rotoscoped and chroma keyed elements. This is a case where it will take you time to learn how to best deal with these edges. Fortunately, Primatte Studio has tools to help with motion blur.
But there’s also a way to get around this that may work on set for some shots, saving you time when compositing. You – or your DP – need to be able to adjust the camera shutter speed, setting it to a fast (short) exposure time of at least 1/125 sec. or higher. This higher speed reduces motion blur in the recorded scene. While it might look a little “edgy” and unreal to the eye, you can “fix it in post” by re-introducing motion blur during compositing.
Primatte uses a unique approach to analyzing and segmenting colors in a chroma key shot. This approach is unique to Primatte and one of the reasons it frequently outperforms other keying software in difficult situations when you need it most. Simply put, 3D color isolation allows Primatte to separate colors that are seen as a single color by other keyers because they lie in two planes. But RGB is three colors and in reality, each color vector lies on its own plane. Primatte does its calculations in these three dimensions individually. This is a far more accurate way of defining the subject and the background colors separately.
More specifically, Primatte creates nested polyhedrons in 3D space. Let’s break down this approach.
Polyhedron
A solid 3D shape with flat polygonal faces and straight edges. A polyhedron can be any shape.
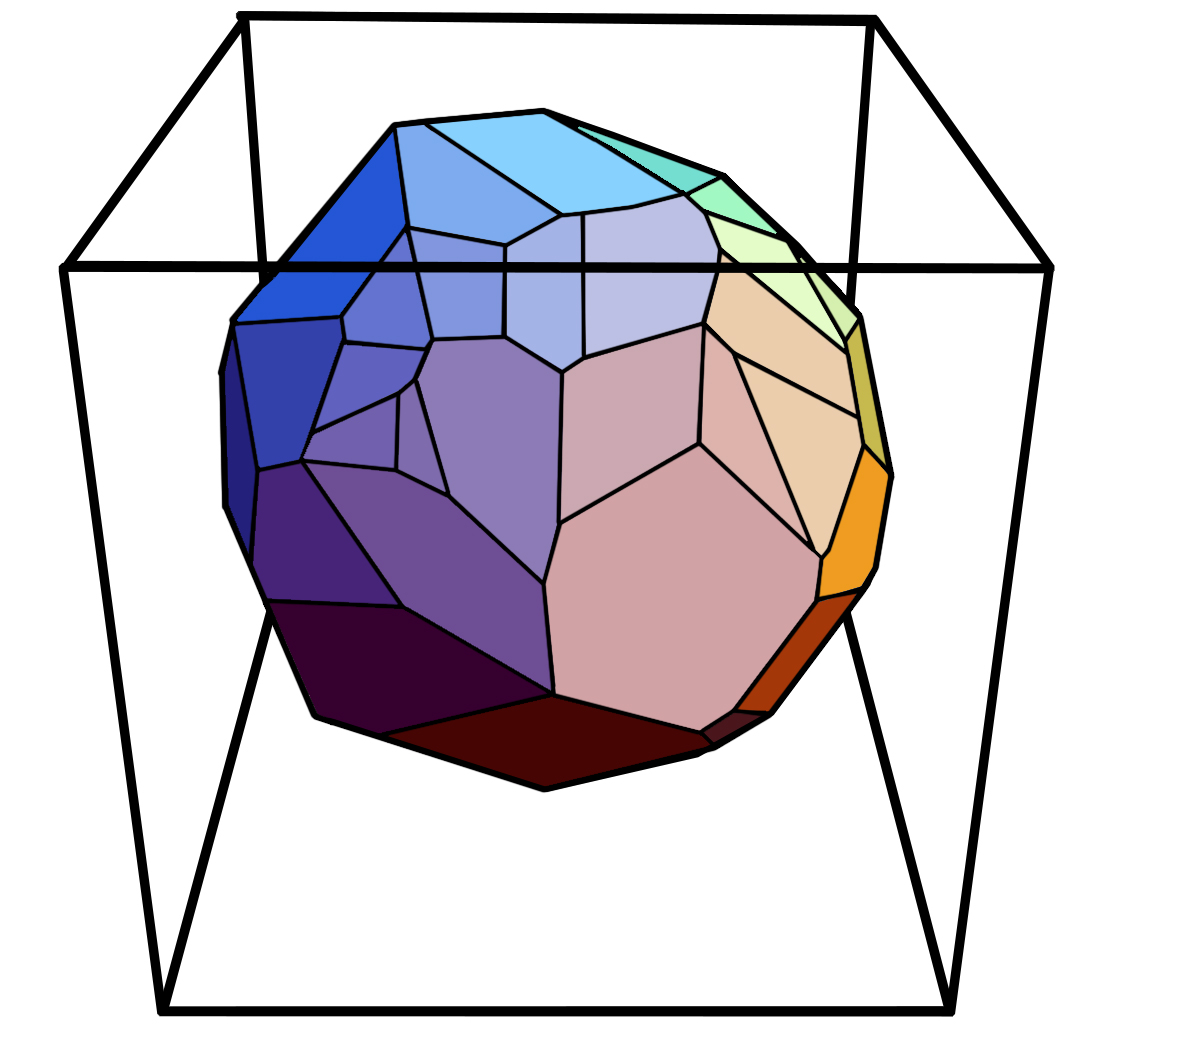
A typical Polyhedron in a 3D cube. A polyhedron can be any shape (box, globe, pyramid or a complex asymmetrical shape)
3D Color Cube
In color science, three primaries are used to create any color in the visible spectrum. Below.
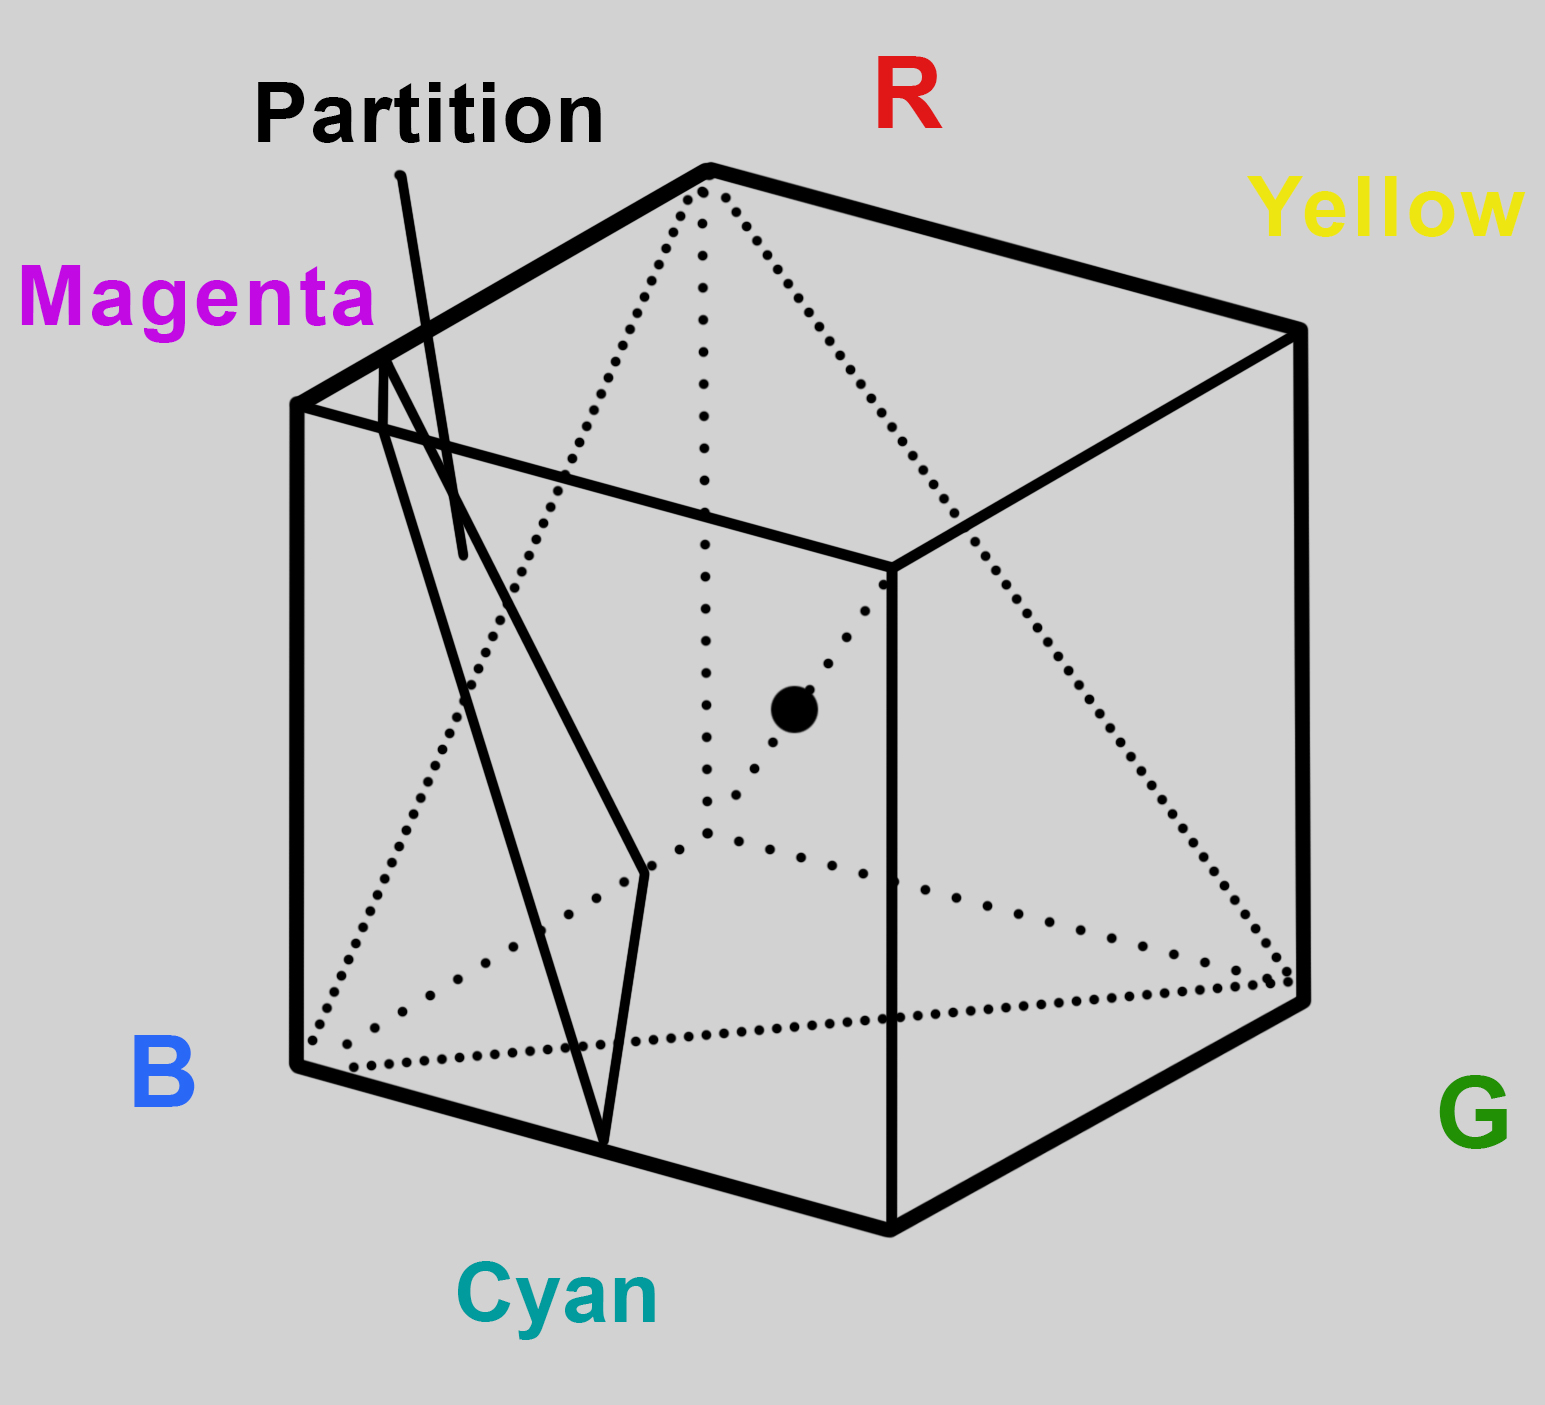
The R, G, B primaries are at the corners of the cube that represents 3D color space. Primatte has developed a system that nests four polyhedrons - one inside of the other - without any polyhedron border penetrating another border.
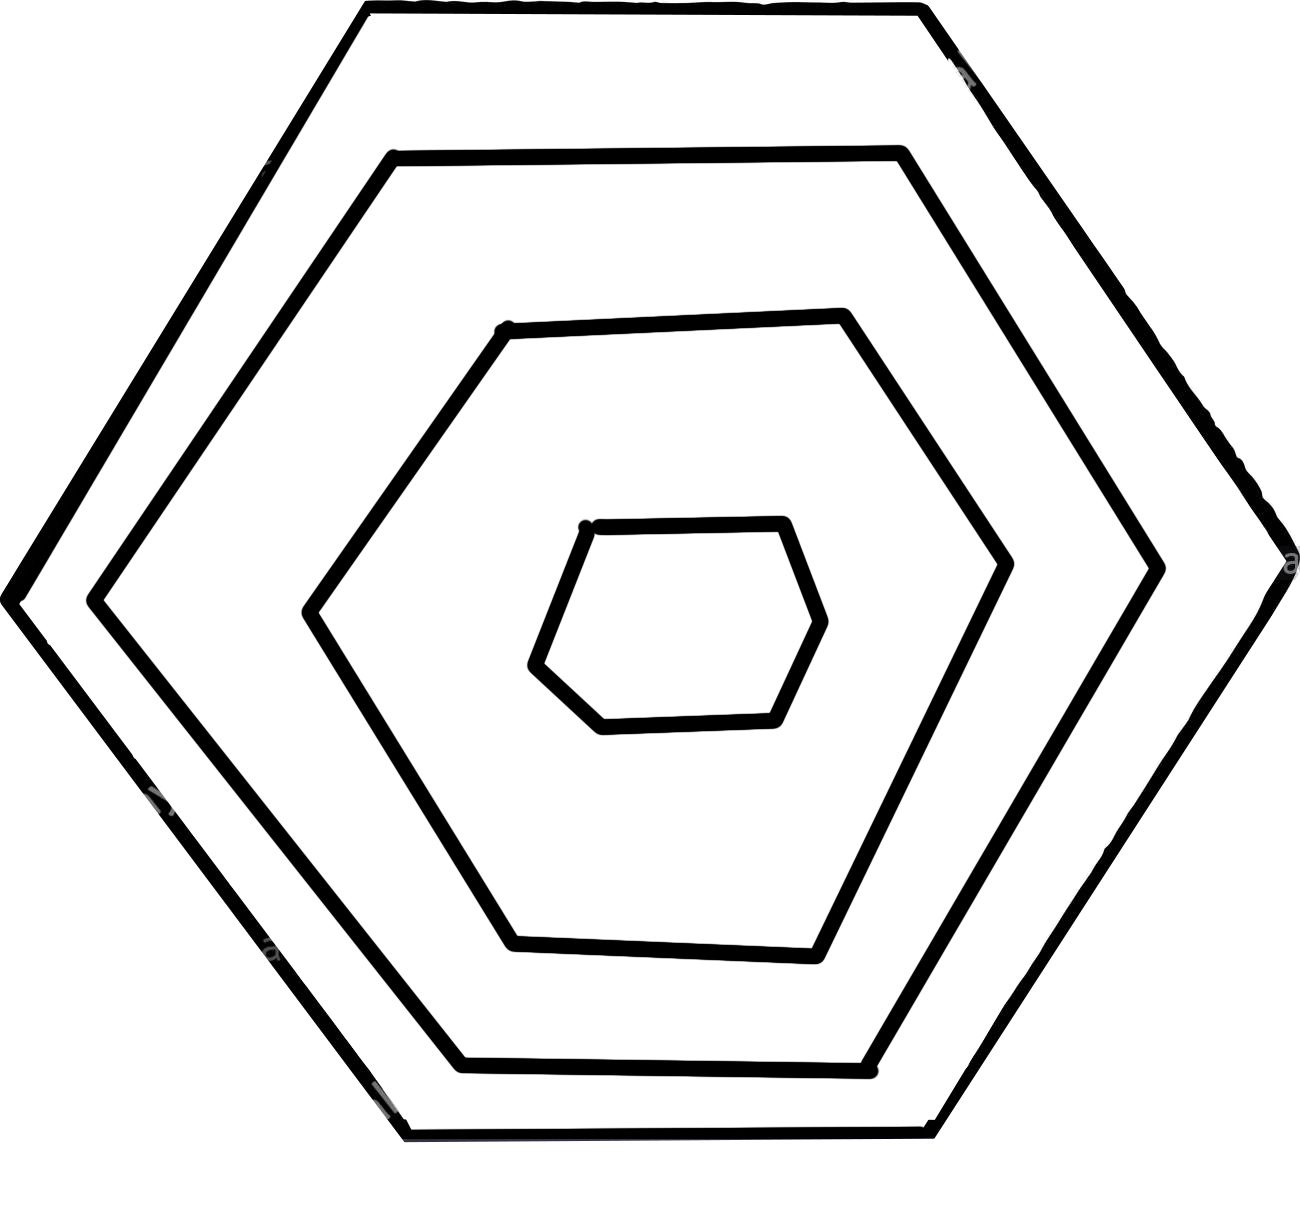
Shown in 2D for clarity (above), are four polyhedrons one inside the other. These are the four segmented color spaces in Primatte. They all share the same center point. You begin with a sample of the background.
Segment One: This is the smallest polyhedron at the center of the four polyhedrons. Your first sample in Primatte establishes the center point for all the polyhedrons and places all the sampled pixels in Polyhedron One. It contains all the pixels in the foreground image that are considered 100% background (green or blue). If your subject is a car then any pixels from the car that are in the Polyhedron One are replaced with background pixels. There is no spill suppression in this space.
Segment Two: This is an area between Segment One polyhedron and Segment Two. It contains the foreground pixel colors at the edge of the foreground. These are things like wispy hair, semi-transparent materials like water, smoke, glass, or motion blur. Spill suppression is applied to this segment to remove unwanted color spill from the background.
Segment Three: This is the area between Polyhedrons Two and Three. It contains foreground pixel colors that are 100% foreground. Spill suppression is applied to this segment to remove unwanted color spill from the background.
Segment Four: This is the area outside the largest polyhedron. All pixels within this area are 100% foreground color but without spill suppression.
Another way to think of this is that the Segments are a range of colors from background to foreground. Segments One and Four are unambiguously subject or foreground colors. The other two segments are reserved for pixels that are colors of a value in between the foreground and background colors. These are the pixels that offer the greatest challenge to chroma key algorithms.
Shape-Shifting Polyhedrons
As you work on a key with Primatte using its tools to refine the separation of foreground and background, you are choosing colors that might lie outside one of the segments but belong in that segment. Primatte solves this by changing the shape of the polyhedron to include these pixels. The other polyhedrons will deform accordingly so no boundaries are violated and they all sit neatly within each other.
This action of the polyhedrons to accommodate colors that belong within one segment or another is more accurate than traditional chroma key algorithms and allows for more accurate targeting of the most problematic colors.
Advanced Chroma Key Techniques (a user story)
Even the best keyers can’t pull a key in a single pass under certain circumstances. What happens when the subject has on a wide variety of colors when shot against a dark grey background? It wasn’t a great choice for the background, but an editor and compositor still has to get the shot to work when a reshoot is not possible.
The above situation was described to us by editor Paul Stephens of PBS station, WGBH, in Boston who turned to Boris FX when other keying software failed, “My use of Primatte Studio came as a result of needing to key out one of our major non-profit donors from a dark gray background, rather than the usual green screen set up. This proved to be a challenge with other keyers as they would grab the low end — the blacks and mids — of our person and did not have the fine-tuning capabilities to cleanly separate the background.”
Paul first tried to solve his problem using multiple comps, the advanced technique that compositors use to isolate problem areas separately. For example, if a subject is wearing a shiny hat that catches a great deal of spill and is also holding a wine glass in front of the keying background and has a long sheer scarf that is moving rapidly in front of the background causing motion blur, it will probably be necessary to solve each problem on a unique keying pass. So instead of one keying pass for the subject, there could be four passes — shiny hat, glass of wine, sheer scarf, and then a base pass of the subject. The three problem areas each receive a garbage matte and a unique keying pass.
 “As an Avid Editor, I first tried using those built-in tools, but only had limited results, Stephens told us, “Then I tried Adobe After Effects and, while the results were decent, I found myself rotoscoping, masking, and keying ever more complex comps and spending way too much time trying to get it right. Which, let's face it, is a factor. I had literally 47 different takes that needed to be keyed and anything to streamline the process would be critical to determining the best tools and workflow.”
Paul was lucky insofar as Boris FX is located in Boston and were able to help their hometown neighbor at PBS. “It was right around this time I saw Peter McAuley, Continuum’s Senior Product Manager, give a demo of the Primatte Studio at the Boston Avid User Group. Boris and Peter agreed to help directly and visited our studio. Basically, what we ended up doing, was to take several passes at each clip. We made a key for the torso, a separate key for the head and hair, created a matte around the entire body using the built-in Mocha tool, and inverted everything to remove the background. All using Primatte within the Avid. Sounds a bit tedious, but once created, you, in effect, have a template to drag and drop on to the next clip which then might only require minor finessing. The whole project, therefore, went much, much faster.”
The advantage of Continuum Primatte Studio is that users can directly access Mocha for the roto work. Overall, advanced techniques are a divide and conquer approach, quite similar to the way a purely rotoscoping job breaks down a running figure by isolating the torso and each limb separately. These are labor-intensive assignments and the more streamlining that is available the better. Watch the Continuum Primatte Studio "Pulling a Perfect Key" training series to learn how to easily key and composite inside Avid and Resolve workflows.
Conclusion
There are plenty of chroma key screen solutions on the market at various price ranges. Sometimes it’s best just to rent a dedicated chroma key stage. While Primatte and other compositing tools offer very powerful features, chroma key has been working fine for many years when the lighting is done properly. You will only lose sleep when you have badly shot footage. When the footage is good, Primatte will quickly get you an isolated subject ready for compositing. And when the footage is not good, Primatte is your best friend. So the real area to concentrate on is lighting which is the most common culprit when chroma key problems arise.
You can have multiple channels for a single image in digital compositing. However, a red, green, and blue channel is mandatory if you are using RGB color space. In 24-bit compositing, you have 8-bits each per red, green, and blue channels 3 x 8 = 24. You can add a fourth — the alpha channel — which brings the bit depth to a total of 32-bits. This added channel holds 8-bits of transparency information represented in 256 steps from black to white; totally opaque (white) to totally transparent (black). Photoshop uses this channel as a mask.
This is simply another type of keying methodology only it doesn’t use color information. Luma keying dates back to the silent era, obviously pre-digital software. An analog luma key relied on the black background to not expose the film in a first pass while the exposed area was a window or doorway. A second pass would reverse the exposed and unexposed areas so the black area was exposed while the “protected” window or doorway was blacked out on set or in a matte box fixed to the front of the camera. This restricted this type of effect to limited setups and often produced shaky composites since this effect pre-dated the first pin-registered movie cameras.
The travelling matte is the technique that basically defined modern visual effects. As previously mentioned, the early methods of image replacement for visual effects required that an element, such as a dinosaur, could not move in front or in the back of the subject of the scene. Each was confined to a protected area of the frame with a static matte. There were techniques such as background projection, a separate technique that allowed for better integration, but this was far from ideal. The travelling matte solved this limitation by allowing the subject to be recorded separately from the background and later both were composited into a single shot. Chroma keying was the magic sauce that made this possible.
Optical Printer / bi-pack camera / animation stand
All three devices were used for visual effects prior to the advent of digital compositing. The optical printer could have one, two, or three “heads” in the optical axis of the camera. The heads were essentially projectors that could simultaneously project imagery onto the camera film. In the analog era, each head was the equivalent of a layer in After Effects. The downside of this type of effect technology was that each optical printer pass was another generation removed from the original footage at the expense of image quality.
There are two types of light projection diffuse and specular. Diffuse light is soft and reduces the edges of shadows. Hazy or cloudy days produce diffuse light where shadows are barely visible. Specular or hard light is the opposite. The sun is specular which is why on a clear day shadows are clean and crisp. Lighting instruments can be either soft or diffuse because the lamp or source is diffuse or a softening material like a frost gel is fixed to the front of the light. Bounce light, created by aiming a specular light at a white card aimed at the subject, is another way to make a diffuse source. Diffuse light is harder to aim but it is the preferred light source for shooting portraits since it minimizes wrinkles and creates pleasing rounded modeling.
A cyclorama or cyc is a backdrop or hard wall in a studio or stage that is used as a background. It can be a painted scene or a white surface that can be lit with color or left white. Typically a studio with a hard-wall cyc has the bottom curved where it meets the floor to remove the hard edge.
In photography, this is a variable lens aperture that controls the amount of light exposing the film. Typically this is a bladed mechanism or leaf shutter that works within the lens assembly allowing the diameter to be increased and decreased. The f/stop settings are a progressive series engraved on the lens barrel, for example, f/1.4, f/2., f/2.8, f/4, f/5.6, f/8, f/11, f/22, etc. Each of the preset numbers is called an f-stop or stop. Lenses usually provide intermediate half stops that are not marked on the lens but will snap to these values as the aperture ring is rotated. Descending from f/22, each f-stop in the series allows double the amount of light, so f/11 allows twice the light to expose the film (or sensor) as the f/22 setting and so on down to f/1.4.
Depth of Field is the amount of area in focus for any given lens aperture setting measured along the optical axis. When you focus a lens on a subject there is a fixed point in space providing maximum sharpness. The space in front or in the back of that plane is technically not in absolute focus, but in practice, this space may be visually in focus. This area of acceptable focus is the depth of field. There is always more depth of field behind the focal plane than in front and the rule of thumb is that one-third of the DOA in front of the plane is in focus and two-thirds of the space behind the focused plane is in focus.
Photographers use a grey test card for making exposure tests that typically include a series of grey values 1 – 10 as shown in the image below. There are many test cards available, but the background is always middle grey with 18% reflection. Why isn’t middle grey 50% reflectance or half-way between white and black? The 18% value is based on human perception and the fact that our visual system is not linear. In other words, when you double the amount of light landing on a surface our visual system does not perceive this as double the brightness. It does perceive 18% grey reflectance as the mid-point between black and white.
 Middle gray diagram
Spill (chroma key)
In Chroma key photography, this is the light from the background screen that lands on the subject and should be avoided. It also works the other way when light intended to illuminate the subject lands on the screen. Either of these contamination problems can cause problems in pulling a key and there are tools in most keying software to reduce or eliminate the problem. However, the first line of defense is to properly light the background and subject separately.
Human beings can see only one continuous segment of the electromagnetic spectrum. Ultraviolet to infrared or 430 to 720 nanometers. A red laser produces light of just a fraction of the red portion. A household incandescent light bulb produces what we call white light, but it’s actually composed of a large part of the visible spectrum. White light can be warm or cool, basically reddish or bluish, but it contains a bit of everything in the visible spectrum in varying proportions. When this is plotted on a curve it’s a bell shape with the peak hovering over the middle as shown below.
About the Author
 S.D. Katz is a writer/director/producer working in film and television. His work has appeared on Saturday Night Live and in film festivals around the world. He is also the author of the best-selling books on film design and directing, Shot by Shot and Cinematic Motion. Learn more at shotbyshotbook.com